The Capture of Mandalay Hill, March 1945
During four days in March 1945, British, Indian and Gurkha troops fought to clear Mandalay Hill, a feature that rises up from the flat Irrawaddy River valley and overlooks the nearby city of Mandalay. The city was a significant objective in the minds of the men of the 19th Indian Infantry Division who would shortly be fighting to capture it. Major L.J.L. Hill, Company Commander, 'B' Company, 2nd Royal Berkshire Regiment recalled the boost to morale that occurred when Mandalay Hill was first sighted by the men of his company:
"At about 12:30 we sighted Mandalay Hill, about five miles to the south, so the company earned with O Group the reward of 1,000 cigarettes offered by the CO to the first man sighting this famous landmark! It was an inspiring occasion and one I will remember long: the temples which surmount it and which are built along its summit showed particularly clearly, gleaming gold in the dusty haze. Here, before us, was our first real goal at last: a recognizable place on the world's maps, not just an unknown village or a tangle of jungle. We would now be up against another major centre of resistance, I thought."[1]
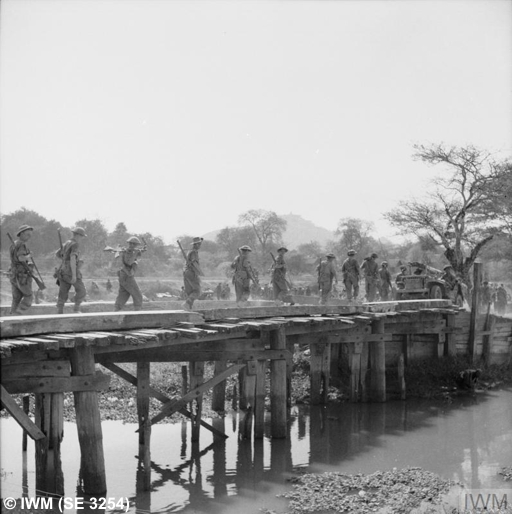
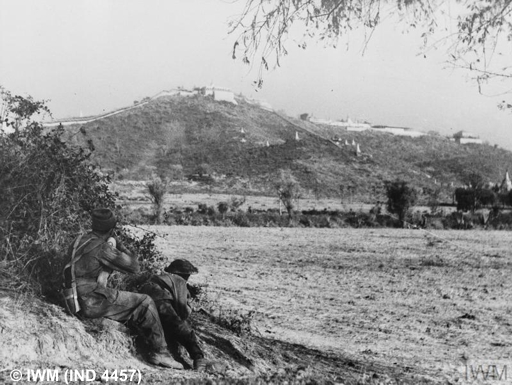
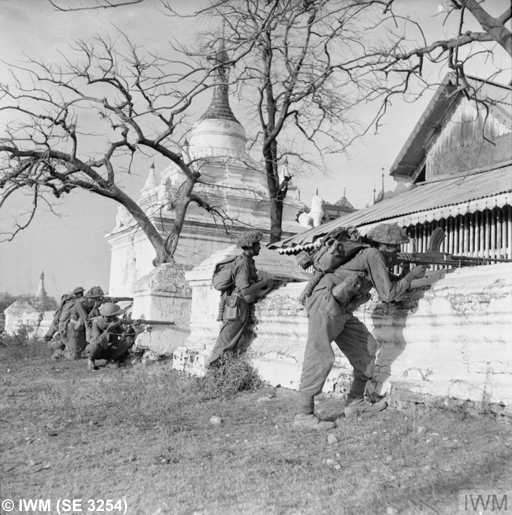
British troops marching towards Mandalay get their first sight of Mandalay Hill (in silhouette behind the trees).
For Major Hill and his men, this sight was the culmination of a long march that had begun in Assam, India, back in November 1944. Following the defeat of the Japanese offensive at Kohima and Imphal, the 14th Army went on the offensive with the objective of recapturing Burma. As part of the Army’s advance to the Irrawaddy River, the area to the east of the Chindwin River was to be seized by the XXXIII Indian Corps, of which the 19th Indian Infantry Division and the 2nd Battalion, Royal Berkshire Regiment were a part. The Corps had orders to capture Monywa, occupy the Yeu-Shwebo area north-east of Mandalay and then to cross the Irrawaddy and take Mandalay itself. Against scattered Japanese resistance, the advance progressed well. On the nights of 13th/14th and 14th/15th January, the eastern-most division of the Corps, the 19th Indian Infantry Division, made two crossings of the Irrawaddy; at Thabeikkyin and Kyaukmyaung. The bridgeheads were immediately consolidated and enlarged whilst the Japanese bridgehead on the west bank was destroyed. By the end of January, the Japanese 15th Division had assembled sufficiently strong forces to attempt to eliminate the bridgeheads but soon realised that the best they could achieve would be to contain them rather than destroy them. Towards the end of February even this limited objective had to be abandoned and on 23rd February, the 19th Indian Infantry Division advanced out of the bridgeheads, heading south towards Mandalay. By the evening of 4th March, the Division’s 98th Indian Infantry Brigade had established a bridgehead across the Chaungmagyi Chaung and as the 62nd and the 64th Indian Infantry Brigades drew up from the north, preparations were made for the final drive to Mandalay.[2]
The next day, 5th March, the 19th Indian Infantry Division gave orders for the formation of a mobile detachment to be known as 'Stiletto' Column or ' Stiletto' Force. The column’s mission was to make a lightning-fast thrust to the south, along the mud flats of the Irrawaddy River, to the west of the dusty main route which followed the axis of the railway line leading to Mandalay, by-passing or rolling over the Japanese before the enemy could organise a proper defence. The 98th Indian Infantry Brigade, relieved by the 62nd Indian Infantry Brigade, was to ensure the column was sent on its way safely and then to follow closely behind down the main road from Madaya. The 64th Indian Infantry Brigade took the third possible line of advance to Mandalay, to the east down the motorable track along the line of the Dinga Chaung. The column was composed as follows:
- 1st Battalion, 15th Punjab Regiment, mounted in lorries and commanded by Lt. Colonel S.G. Gardiner who also commanded the column,
- 'C' Squadron, 7th Light Cavalry, less one troop, equipped with Stuart light tanks,
- No. 3 Troop, 'C' Squadron, 150th Regiment, R.A.C., equipped with M3 Lee medium tanks,
- 240th Field Battery, 115th (North Midland) Field Regiment, R.A., equipped with 25-pounder field guns,
- ‘G’ Troop, 275th Battery, 33rd Anti-Tank Regiment, R.A., equipped with 6-pounder anti-tank guns and 3-inch mortars,
- 'D' Company, Machine Gun Battalion, 11th Sikh Regiment,
- two sections, 64th Field Company, Indian Engineers,
- one company, Field Ambulance, I.A.M.C.[3]
‘Stiletto’ Force Arrives - 8th March
Moving off on the evening of 5th March, the ‘Stiletto’ by-passed Madaya and continued on its way to Mandalay. Madaya itself was occupied unopposed by the 98th Indian Infantry Brigade but as the lead battalion, the 2nd Battalion, Royal Berkshire Regiment, was consolidating on the morning of 7th March, it was counter-attacked by around 100 Japanese. The attack was fought off, with around a third of the enemy being killed and one taken prisoner. During the day, 'Stiletto' advanced as far as the area of the village of Sinywagale, a little to the west of Kabaing. With no let up, the column drove on through the night and 'B' Company, 1st Battalion, 15th Punjab Regiment occupied the 'chaung' (at map reference 584705), just to the north of Mandalay and to the west of the northern slopes of Mandalay Hill. This was reported to be the only crossing suitable for tanks and motor vehicles. On 8th March, the intention was for the vanguard of 'Stiletto' Force to approach Mandalay across the causeway, enter the city from the west at Obo and to capture Mandalay Hill. Having accomplished these objectives, 'Stiletto' Force was to then establish a firm base west of the hill. At 05:15 on the morning of 8th March, a platoon was pushed forward to Obo Railway Station without incident but discovered, as reported, that the 'chaung' at map reference 599703 could not be crossed. At 06:15, 'A' Company, 1st Battalion, 15th Punjab Regiment, accompanied by tanks, passed through 'B' Company and entered the northern outskirts of the city at Obo village, the first troops to re-enter Mandalay since it fell to the Japanese in 1942.[4]
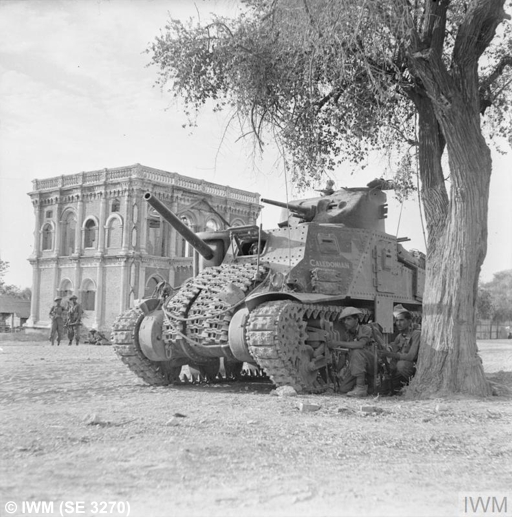
'Caledonian', an M3 Lee of 'C' Squadron, 150th Regiment, R.A.C., supporting infantry of the 19th Indian Division, Mandalay 9th-10th March 1945.
It was thought that ‘Stiletto’ Force would accomplish it objectives for the day easily as it was reported that Mandalay was defended by maybe as few as 200 Japanese without artillery. This expectation was soon disabused. The Japanese were taken completely by surprise and at first, small parties of the enemy were seen moving around in all directions. These were fired upon by the infantry and the tanks, inflicting many enemy casualties, and later 23 Japanese bodies were counted. 'A' Company and the tanks then continued probing eastwards towards the north end of Mandalay Hill. 'B' Company was then pushed forward to Obo Railway Station, followed by the remainder of the column. As elements of the column continued to seek out the Japanese defences, two of the Lee tanks were damaged by enemy gunfire. Although disabled, the tanks returned fire and claimed to have knocked out three enemy guns, including a 105mm gun which was subsequently captured. Some groups of Japanese then attempted to move in from the east but were dealt with by the infantry and tanks.[5]
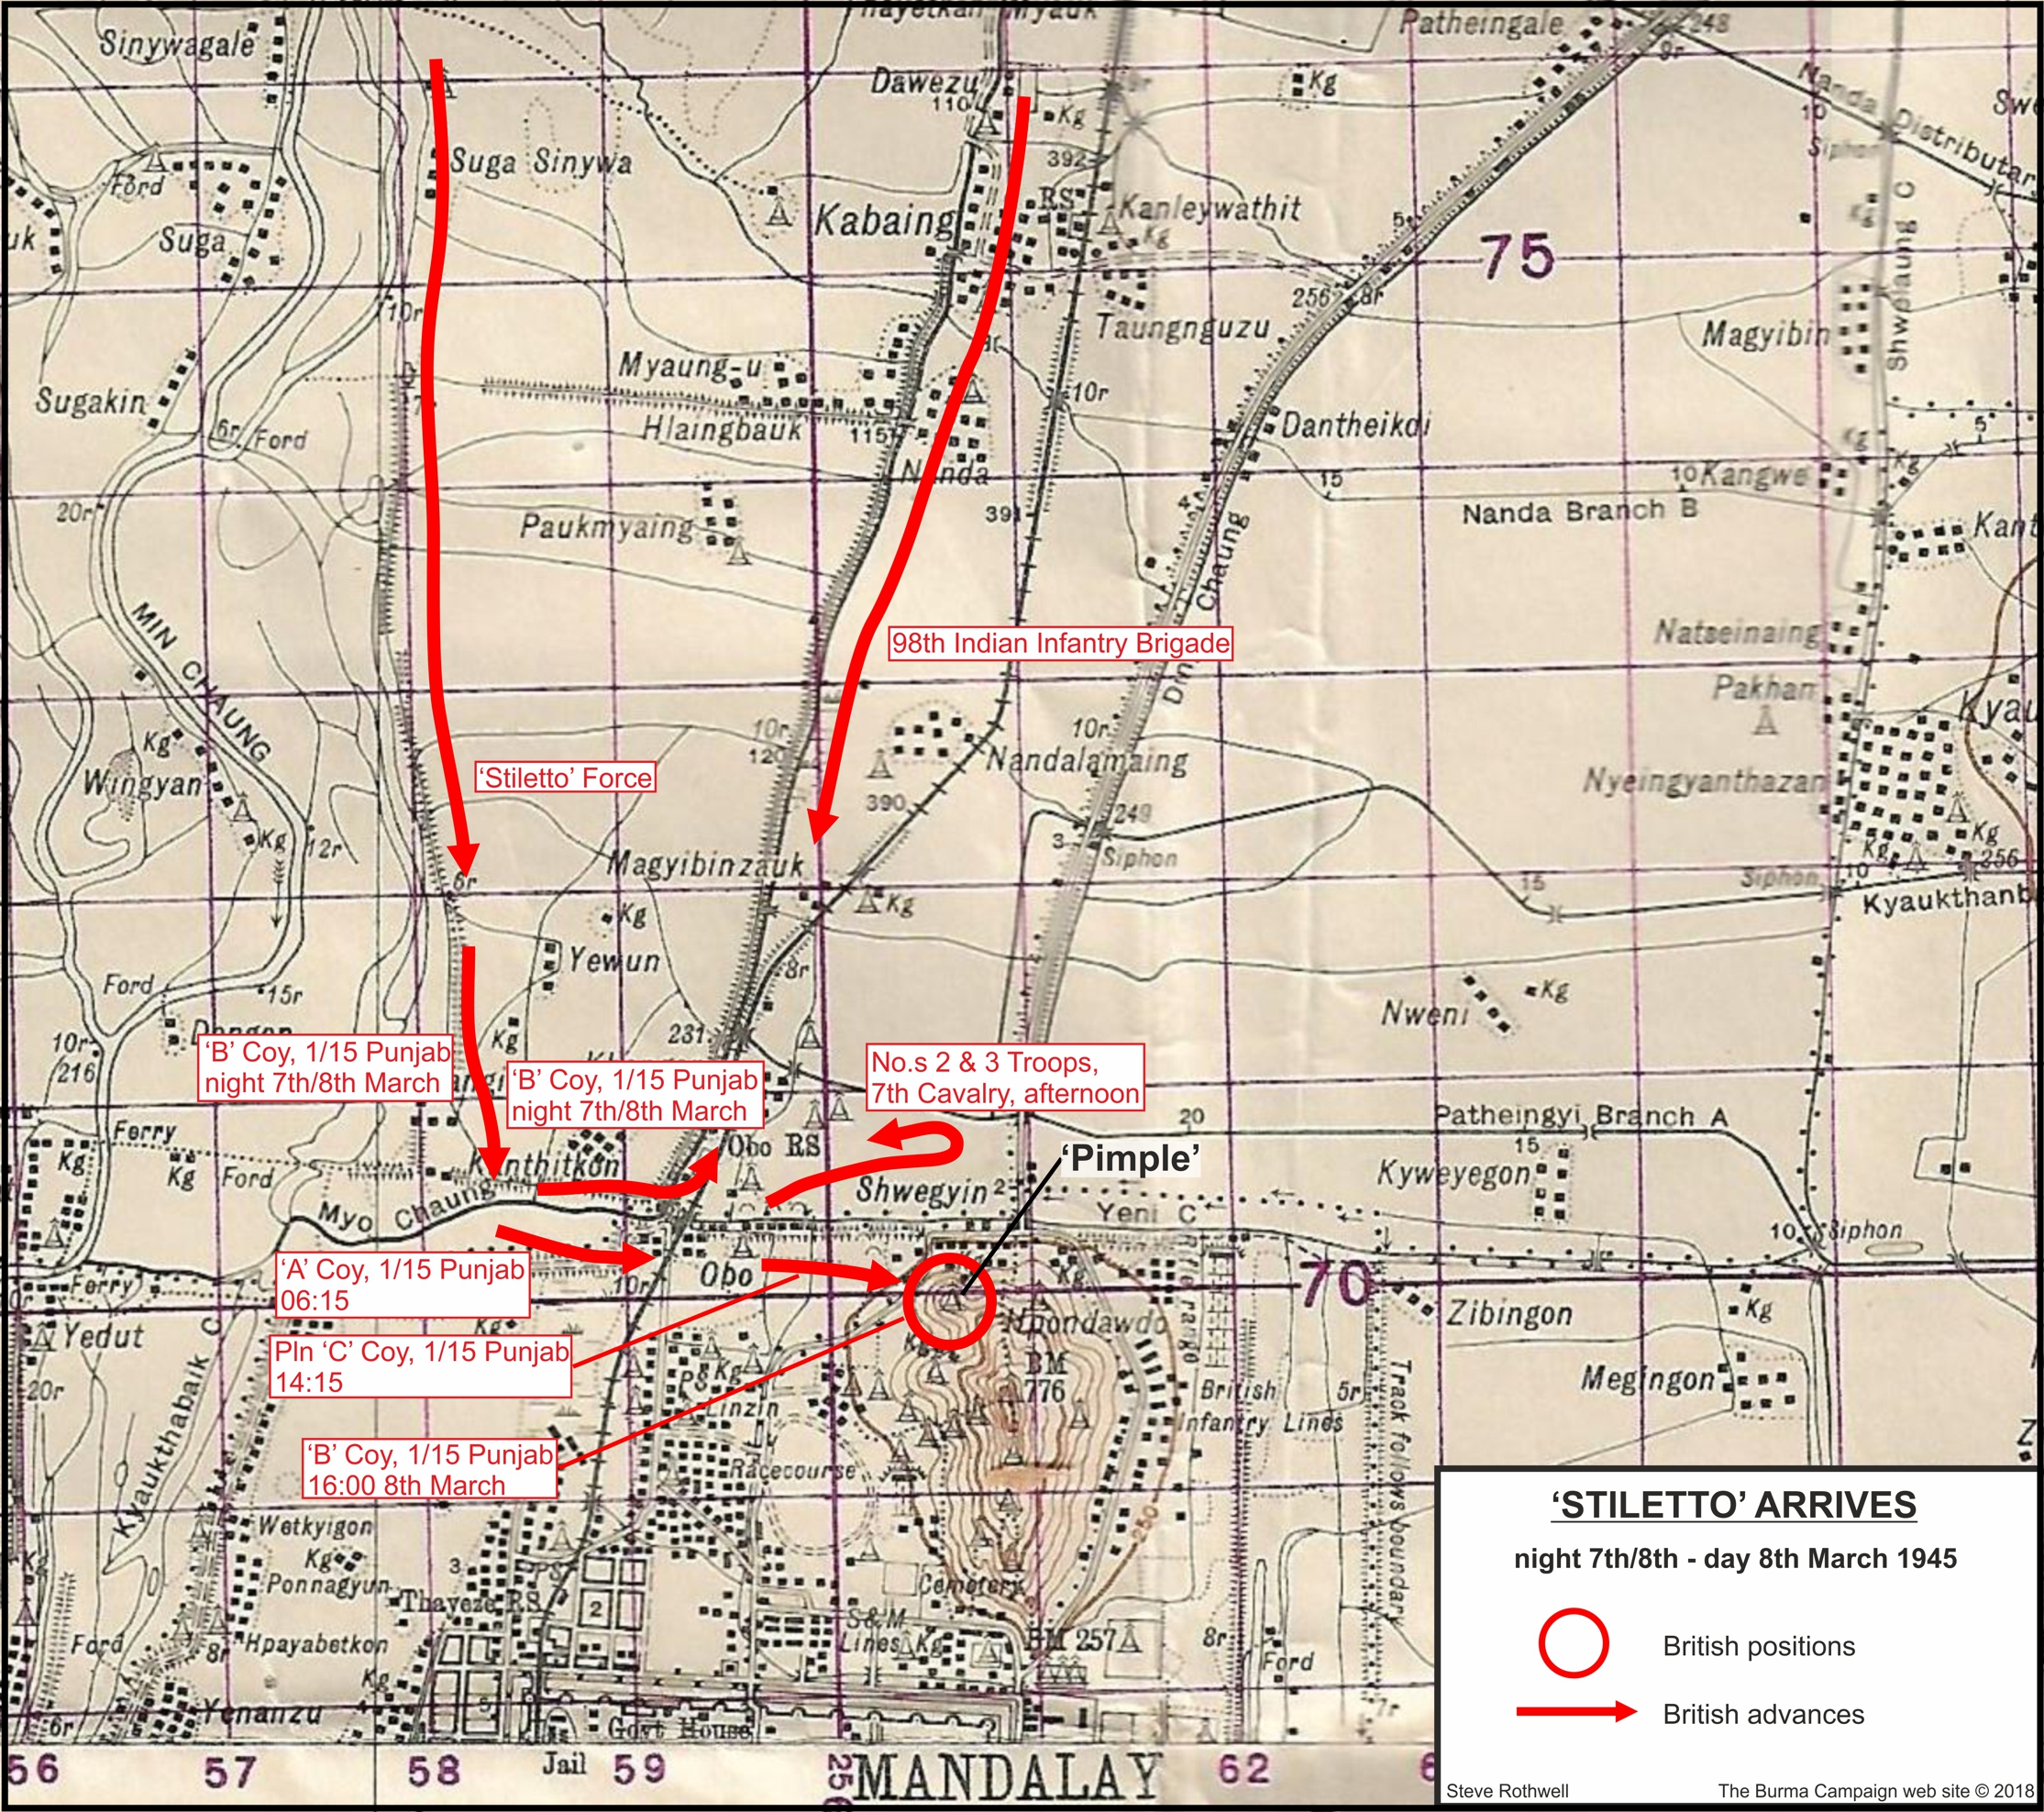
Stiletto Force arrives, 8th March 1945
Click image to open full size in new window
It was then decided to occupy a small hill feature, referred to as the 'Pimple’, on the north west end of Mandalay Hill (map reference 606700). A platoon from 'C' Company, 1st Battalion, 15th Punjab Regiment, set off at 14:15 with support from the medium machine guns of the 11th Sikhs, two Stuart tanks of the 7th Light Cavalry and a third Lee medium tank which had just arrived. The Punjabis occupied the feature by 15:30, against little opposition and with no casualties. The enemy were found to be dug in on the reverse slope of the feature and were dealt with by grenades; twelve enemy dead being counted. 'B' Company then came up to relieve the platoon and was established by 16:00, despite coming under fire from the higher slopes of Mandalay Hill. From this, it became obvious that the Japanese occupied the hill in some force. During the afternoon, the area occupied by the Tactical Headquarters of 'Stiletto' Force to the west of Obo came under heavy Japanese shelling and one of the Lees damaged earlier and evacuated for repairs, was hit again and burnt out.[6]
More troops from the 98th Indian Infantry Brigade arrived from the north during the afternoon. The enemy was then seen to be moving southwards down the main road to Shwegyin (at map reference 610704) and two troops of the 7th Light Cavalry were sent out to investigate and to reconnoitre the road. No. 3 Troop was slowed down by flooding and the tanks came under anti-tank and small arms fire from the north end of the hill and both were hit and caught fire. The radio operator of the troop leader's tank, Sowar Munshi Lall, was wounded and could not be got out of the burning tank in spite of the valiant efforts of the troop leader and his driver. Sowar Kartar Singh was also wounded but he and the other crews were all evacuated safely to the position held by No. 2 Troop, despite machine gun fire from the position of the enemy 47mm gun which had destroyed their tanks. 'Stiletto' Force was relieved and concentrated in the area of the Myo 'chaung', to the west of Obo village (map reference 5870). 'B' Company, 1st Battalion, 15th Punjab Regiment remained in occupation of the 'Pimple' feature.[7]
An Indian military policeman keeps the troops moving as Gurkhas advance towards Mandalay, March 1945.
The first troops to arrive after ‘Stiletto’ Force belonged to the 8th Battalion, 12th Frontier Force Regiment (F.F.R.). As it marched south, the Battalion had met strong opposition but was able to clear the road and continue on. The Battalion entered the northern outskirts of Mandalay shortly after 14:00 and assembled near Obo Railway Station. Two hours later, 'A' and 'B' Companies were sent a little further south to the area of Linzin where they were to act as a 'stop' against Japanese still holding Mandalay Hill. Shortly after arrival at Linzin, the two companies were shelled by a Japanese 105mm gun which injured three men and three mules. Next to arrive, at around 16:15, was the 2nd Battalion, Royal Berkshire Regiment, which had left Madaya at 07:00 that morning, and marched straight down the road to Mandalay, following in the wake of the 8th Battalion, 12th F.F.R. This Battalion completed the 15 mile march in around nine hours, in great heat, carrying full equipment, and having dealt with slight enemy resistance, and by the evening all the men were very tired. At 17:30. 'B' Company was ordered back up the road, travelling in trucks, to clear Japanese from Kabaing where they had attacked the Divisional transport and killed several men. Upon arrival, the company undertook a very successful action, killing eighteen Japanese, including two officers, without loss. Most of the enemy were found in a 'chaung' and dealt with by hand grenades. Having cleared the village, 'B' Company stayed in the area to protect the Tactical Headquarters of the 19th Indian Infantry Division. The remainder of the Battalion took up positions for the night at Khangon, just north west of Obo Railway Station and close by the brigade headquarters. [8]
The last battalion of the 98th Indian Infantry Brigade to arrive was the 4th Battalion, 4th Gurkha Rifles. Having boarded trucks borrowed from the divisional artillery, the Gurkhas left Madaya at 10:15 on 8th March, following behind the 2nd Battalion, Royal Berkshire Regiment. However, just under an hour later, at a point on the road six miles to the south, the troops left their trucks and proceeded on foot. There were many halts, mostly caused by a lack of traffic control, the passing vehicles throwing up large clouds of dust to add to the misery experienced by the troops as they waited to march forward again in the intense heat.[9]
At 16:05, an orders group was held at the Headquarters, 98th Indian Infantry Brigade at which the 4th Battalion, 4th Gurkha Rifles was ordered to move to the eastern or left flank of the Brigade and capture Mandalay Hill. According to Major Hill, it was the 2nd Battalion, Royal Berkshire Regiment who were first selected to attack Mandalay Hill. However, just as the men began to deploy for the attack, the orders were changed and the 4th Battalion, 4th Gurkha Rifles were given the task. Major Hill recalled that the Commanding Officer of the 4th Battalion, 4th Gurkha Rifles, Lt. Colonel J.N. Mackay, had specifically requested that his battalion make the attack as he knew the hill and its layout well from pre-war days. As an Indian Army Officer, Mackay had been seconded to the Burma Defence Forces in 1937, serving first with the 2nd Battalion, The Burma Rifles and later, during the Japanese invasion, with the 5th Battalion. It was during the 1942 campaign that Mackay had been awarded the Distinguished Service Order for gallantry. The orders called for the Gurkhas to march to a position at the foot of the northern slopes of the hill from where the assault would be launched. The Gurkhas would receive direct artillery support from the attached 480th Field Battery of the 115th (North Midland) Field Regiment, R.A. and further artillery support was on call from the Divisional artillery.[10]
Mandalay Hill as seen from the west, March 1945. The 'Pimple' feature can be in the middle of the photograph, below and to the right of the 'Big Pagoda' (Sutaungpyi or Su Taung Pyai) on the summit of the hill.
Mandalay Hill rises out of the plain of the Irrawaddy River valley and its steep slopes reach a height of 776 feet at the summit. It dominates the city from the north east and would have been visible to the British and Indian troops from every angle of their approach. On the summit is large temple complex, referred to as ‘Big Pagoda’ by some of the troops (it is actually named Su Taung Pyae). Southwards from the summit, runs a narrow ridge and running along this razor-back spine is a series of temples, monasteries and other buildings, linked by a covered stairway. Underneath these buildings (invariably referred to as pagodas regardless of their function) lie cellars, dwellings and storage rooms. Some of these underground features came to be referred to as ‘tunnels’ in the accounts of the battle for the hill. [11]
Map of northern Mandalay (sheet 93 B-4) showing: Mandalay Hill; the racecourse; cemetery; the Sappers & Miners Lines; the north wall of Fort Dufferin. (Simon Jervis Collection).
The Gurkhas Storm the Summit - Night of 8th/9th March/Day of 9th March
The Gurkha battalion set off at 16:15, moving eastwards to Nandalamaing and then south along the road leading to the north end of Mandalay Hill. As the troops walked across the open country, through wet paddy fields and ditches, in full view of the Japanese on Mandalay Hill, they came under sustained sniper fire from the hill but fortunately suffered no casualties. Meanwhile, unbeknownst to anyone in the 98th Indian Infantry Brigade, two companies and the Battalion Headquarters of the 5th Battalion, 10th Baluch Regiment of the 64th Indian Infantry Brigade were already attacking the hill with the support of a troop of tanks. During the afternoon of 8th March, No. 4 Troop, 'C' Squadron, 150th Regiment R.A.C., together with a platoon of the 3rd Battalion, 4th Bombay Grenadiers in support, had managed to free itself from the somewhat confused fighting with Japanese stragglers at Kabaing, to the north of Mandalay. Moving out to the east, the Troop's orders were to cut off any Japanese retreat to the east. The Troop was then surprised to meet the 5th Battalion, 10th Baluch Regiment of the 64th Indian Infantry Brigade, advancing down the road astride which the Troop sat. Owing to confusion caused by the delay imposed by a broken bridge, this Indian battalion had misheard a code name on the radio and set off for the wrong objective. Instead of moving as ordered to concentrate at Kyaukthanbat, a large village to the north east of Mandalay Hill, the battalion had in fact advanced too far west and south of its intended objective. As a result, at around 14:15, 'D' Company arrived in front of Shwegyin, to the immediate north of Mandalay Hill, where it came under heavy fire from Japanese medium machine guns on and around the hill. The Lee tanks of No. 4 Troop were then placed in support of the Indian infantry, who mounted an attack on the Shwegyin area with two companies. During the attack, one of the Lees, commanded by Sergeant Shaw, was hit by a 47mm gun but did not suffer any serious damage. Sergeant Shaw spotted the flash of the gun as it fired and very quickly put it out of action with high explosive shells from the tank's 37mm gun. The enemy gun was found abandoned the next day. Despite this and other actions, the attack by the 5th Battalion, 10th Baluch Regiment was unsuccessful. The enemy position proved to be too strong, consisting as it did of two strong points with medium machine guns covering an anti-tank gun, and many light machine guns. After suffering two dead and fourteen wounded, the 5th Battalion, 10th Baluch Regiment was held up and, as the 4th Battalion, 4th Gurkha Rifles came up behind them from the north, the Baluchs prepared to pull back through the Gurkhas to the area of Nandalamaing.[12]
With the Gurkhas now having taken over, No. 4 Troop was designated to support them and additional reinforcements arrived in the form of the three Lee tanks of No. 2 Troop, two Stuart tanks of 'C' Squadron, 7th Light Cavalry and a platoon from ‘A’ Company, 3rd Battalion, 4th Bombay Grenadiers. These new arrivals almost immediately ran into Japanese hiding out in the paddy fields. Under the cover of fire from the tanks, the Bombay Grenadiers made a series of bayonet charges and around 30 Japanese were killed without loss. This running fight lasted for around an hour and by the time the tanks joined up with No. 4 Troop and the 4th Battalion, 4th Gurkha Rifles, it was too late for a daylight attack on Shwegyin and Mandalay Hill. The tanks and their accompanying infantry from the 3rd Battalion, 4th Bombay Grenadiers, harboured for the night just to the south of Kabaing at Nanda.[13]
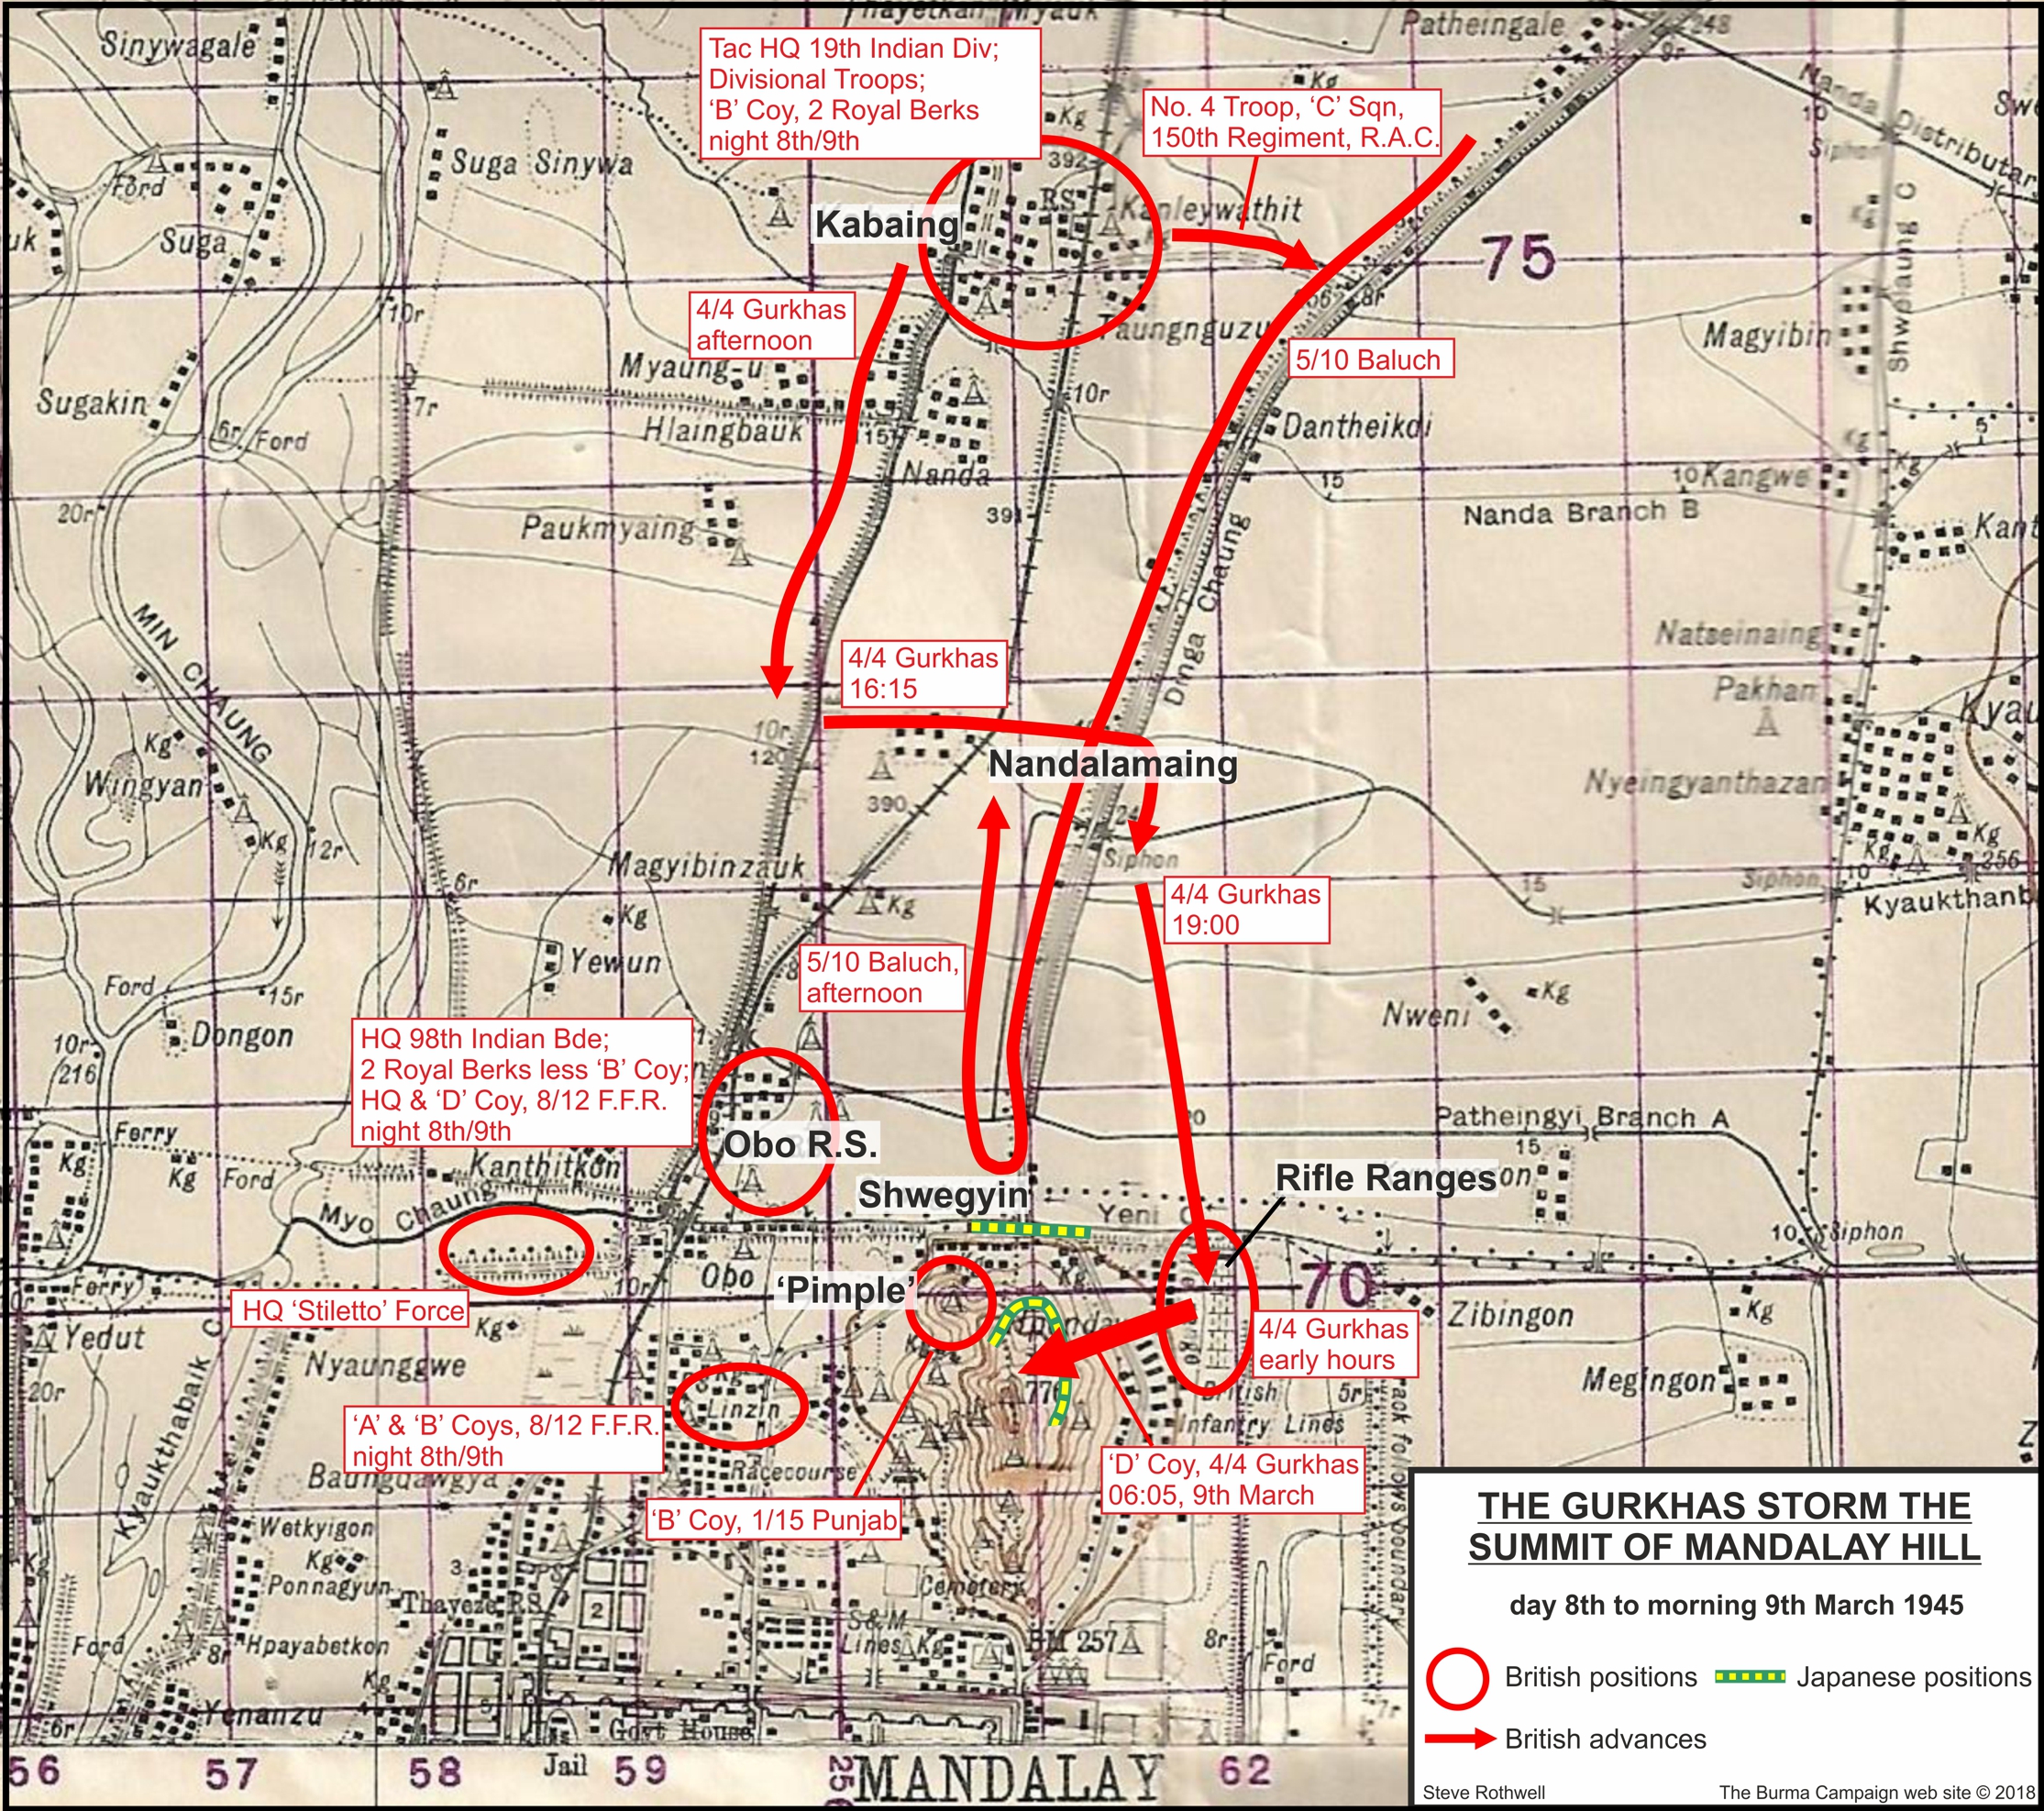
The Gurkhas Storm the Summit, 8th/9th March 1945
Click image to open full size in new window
At 17:30, the Commanding Officer of the 4th Battalion, 4th Gurkha Rifles, Lt. Colonel Mackay, gave orders for a night attack. The intention was for the battalion, with the 480th Field Battery, R.A. in support, to move across country before assaulting the summit of Mandalay Hill, the highest point being Point 776 upon which sat the ‘Big Pagoda’. The first phase involved a night march to the area of the rifle ranges, just to the east of the northern end of the hill. Once here, 'A' Company would form a security screen on the southern and eastern flanks of the position, while 'B' Company, the Battalion Headquarters and Headquarters Company completed the screen to the north and west. 'C' and 'D' Companies were to assault the hill in the second phase. 'D' Company was to carry out the actual assault, with 'C' Company ready to reinforce 'D' Company in the case of success or to continue the assault should 'D' Company be held up. The companies moved off at around 19:00, trying to make as little noise as possible. The Battalion Intelligence Officer, Captain Arthur Gilbert, recalled; “The battalion started off with our mules but we ran into trouble because we were unable to cross a number of chaungs (canals) quietly enough. At one point we could hear the enemy shouting on the Hill and they were too close for comfort. It was decided to send the mules back and go onto a ‘man-pack’ basis. This is not pleasant as it means that very heavy weights; ammunition, mortars, bombs etc. had to be carried by men, who would shortly be required to climb a very steep hill, to attack the Japanese who were waiting for them. B Company were sent back with the mules.” [14]
After what in the end turned out to be an almost noiseless advance, 'A' Company reached the rifle ranges just after midnight. With the perimeter established, 'D' Company moved off for the start line at the foot of the hill at around 03:00, 9th March. At 06:05, 'A' Company ambushed a party of fifteen Japanese who were allowed to approach within 30 yards before being shot down. Then, Subedar Damarsing Pun led 'D' Company in the assault up to the top of the hill. The leading unit was 10 Platoon, under Subedar Aiman Gurung, and after an arduous climb, the platoon reached the first crest only to be met by heavy machine gun fire. Subedar Damarsing personally led his other platoons though a hail of fire to secure a footing on the lower slopes. Subedar Aiman and his men, meanwhile, launched a fierce charge and seized the intermediate position. Still under fire, Subedar Aiman then reorganised his platoon and pressed on to the pagoda on the summit of the hill. The men drew their 'khukris' and raced up the steep hillside, completely demoralising the Japanese defenders. Fighting their way through the courtyards and colonnades of the temple with ‘khukri’ and bayonet, they cut their way through the enemy positions and captured the pagoda. Many of the 70 or so Japanese defenders were killed and the rest fled along the hill crest to lower positions. Captain Gilbert recalled that the infantry were given excellent support from the artillery; “As dawn broke there was a shout of ‘Ayo Gurkhali’ as they stormed the summit and David Hine, the gunner O.P. with them, directed excellent and accurate fire on the defenders. It was a tremendous battle; Kukhris, bayonets and hand-grenades before the hill was ours.”[15] At least fifteen of the enemy were killed. The rest of the company then followed and began to consolidate on the top of the hill despite coming under fire from snipers and light machine guns. For these and other actions, Subedars Damarsing and Aiman and Major Hine were each awarded the Military Cross.[16]
At around 07:30, 'C' Company came up to join 'D' Company and by 09:00 both companies were engaged in the slow and deadly business of clearing the summit of snipers who had been left behind among the rocks and trees. By mid-morning, the Battalion Headquarters and 'B' Company were readying to move to the foot of the hill to join up with the two assault companies. Headquarters, 98th Indian Infantry Brigade was asked to clear the road junction at the northern end of the hill, at Shwegyin, where a large number of Japanese were still active. Snipers and other Japanese equipped with light machine guns had cut the supply line to ‘A’ Company and the Battalion Headquarters at the rifle ranges. 'C' Company, 2nd Battalion, Royal Berkshire Regiment was sent to do this, supported by the Lees of No. 2 Troop, 'C' Squadron, 150th Regiment, R.A.C., and the Japanese were cleared from the area by shortly after midday (see below).[17]

The Sutaungpyi (Su Taung Pyai) pagoda on the summit of Mandalay Hill. Beyond the pagoda, to the south west, is the racecourse. The pagoda and its surroundings were stormed by 'D' Company, 4th Battalion, 4th Gurkha Rifles on the morning of 9th March 1945. 'B' Company cleared the western slope and the racecourse on 10th March but was unable to clear the area of the cemetery and nearby pagodas (the area beginning in the top left of the photograph).
Up on the hill, at 11:30, 'D' Company was counter-attacked by a strong Japanese force supported by an infantry gun firing from the foot of the hill to the south. At least some of the Gurkhas were forced to take cover from the shelling by moving to the far side of the hill. Whilst the enemy attack was in progress, the 'D' Company commander, Subedar Damarsing, when asked by his Commanding Officer if he need anything, gave the reply, 'Yes, breakfast!'. At 12:45, 'D' Company reported that the enemy counter attack had been defeated and that a very large number of casualties had been inflicted on the Japanese. To conserve ammunition during the Japanese attack, the Gurkhas had made much use of captured weapons and hand grenades. Fifteen minutes after this report was received, all available personnel from 'B', Headquarters and Administration Companies were sent up the hill with food, water and ammunition for 'C' and 'D' Companies. At 15:00, 'B' Company was sent to relieve 'B' Company, 1st Battalion, 15th Punjab Regiment on the 'Pimple'. The Punjabis had spent a quiet night on the 'Pimple' but in the morning, a party of Japanese were seen moving along the 'chaung' running east-west to the north of the position. While these were engaged by ‘C’ Company of the 2nd Battalion, Royal Berkshire Regiment from Obo, the Forward Observation Officer (F.O.O.) with 'B' Company, 1st Battalion, 15th Punjab Regiment on the 'Pimple' brought down artillery on top of the Japanese and those enemy not killed were seen to scatter. Some of these survivors then came into view from the 'Pimple' and were fired upon by the Punjabi company. By the end of the morning the company had killed thirty two of the enemy. The majority of those Japanese killed in the area of the ‘chaung’ were found to be in an exhausted condition.[18]
At 15:20, the Brigade Commander, Brigadier C.I. Jerard, arrived at the headquarters of the 4th Battalion, 4th Gurkha Rifles. Orders were given for the Gurkhas to be relieved by the 2nd Battalion, Royal Berkshire Regiment and at 15:45, 'D' Company from this battalion arrived to take over on the hill from 'C' and 'D' Companies of the Gurkhas. The 4th Battalion, 4th Gurkha Rifles then set about digging in at the foot of the hill where the Battalion was to spend the night. Casualties suffered by the Gurkhas during 9th March were seven other ranks killed and fourteen wounded. Of these, four killed and eight wounded were suffered by the leading assault unit, 'D' Company. Enemy losses were 51 killed and an unknown number of wounded. [19]
Elsewhere on 9th March, 'Stiletto' Force, with three infantry companies of the 1st Battalion, 15th Punjab Regiment still under command, had been sent to capture a hill feature to the east of Mandalay (map reference 6765). The column circled around to the north and east before heading southwards to the objective. However, the Japanese opened the irrigation sluices, flooding the surrounding countryside and thus made the ground unsuitable for tanks and motor transport. Unable to pass, the column withdrew to the area of Kabaing where the next day 'Stiletto' Force was dispersed and the troops involved returned to their parent units. During the late afternoon of 9th March, the 8th Battalion, 12th F.F.R. mounted a probing attack on the north wall of Fort Dufferin. In response, the Japanese launched a counter attack consisting of an infantry detachment with an infantry gun, believed to be a 75mm, which advanced westwards from the southern end of Mandalay Hill towards the position held by 'B' Company. A heavy artillery barrage was brought down on this detachment and the supporting Lee tanks were called forward. Fire was exchanged with the Japanese during which the enemy brought the tanks under mortar fire and got off at least one shot from the accompanying gun. The Japanese were then seen to disperse, abandoning the infantry gun, but not before they had scored a hit on the forward suspension of one of the Lees. Fortunately, no serious damage was done and it was only after the action that the hit was discovered. Given this enemy activity and the approach of darkness, the attack by the 8th Battalion, 12th F.F.R was called off.[20]
The Japanese Respond, 9th March 1945
Click image to open full size in new window
The 2nd Battalion, Royal Berkshire Regiment also experienced an eventful day on 9th March. Early in the morning, at 06:30, 'A' Company was sent to deal with more Japanese stragglers who during the night had infiltrated across the lines of communication to the north of Mandalay. At 08:30, with ‘B’ Company not due to return for another hour, 'C' Company was sent to clear yet more enemy troops, this time from the road junction at Shwegyin, to the north of Mandalay Hill. The Japanese were reported to be holding a sunken watercourse, the Yeni Chaung, running from the west near Obo Railway Station eastwards to Shwegyin. The 'chaung' was an obstacle for tanks and motor vehicles moving south into the city and there were few places where it could be crossed. As described above, the Japanese here had managed to cut or interfere with the supply line to elements of the 4th Battalion, 4th Gurkha Rifles in their position at the rifle ranges. ‘C’ Company was supported by the Lee tanks of No.2 Troop, ‘C’ Squadron, 150th Regiment, R.A.C. and their escort, a platoon from ‘A’ Company, 3rd Battalion, 4th Bombay Grenadiers.[21]
'C' Company advanced from Obo Station, with troops on either side of the 'chaung'. The tanks advanced along the southern bank of the 'chaung'. The advance was not straightforward. The watercourse was quite broken, with many side channels and turnings. The Japanese seemed determined to hold on to the death. The tanks found it difficult to depress their guns to fire into the 'chaung' and as a result the attack was largely made using grenades. As ' C' Company fought its way forward, a number of Japanese tried to move out to the south across open ground. These men made easy targets for the Royal Berkshire platoon on the south bank and for the Punjabi company on the 'Pimple'. Caught out in the open, the Japanese were engaged by small arms and artillery fire and killed to a man. At the 'chaung', the British infantry were soon held up by machine gun and rifle fire, where Japanese soldiers were holding two bunkers. Then the tanks and their escort moved forward in an attempt to eliminate the Japanese positions. However, the tanks could not get their guns to bear and it seemed as if the attack would stall. In command of the platoon of the 3rd Battalion, 4th Bombay Grenadiers escorting the tanks was Jemadar Daryao Singh. Jemadar Daryao and his platoon 'havildar', Dalip Singh, each led a section along the 'chaung' until they were 250 yards in front of the leading British infantry. Despite being under heavy sniper, machine gun and grenade fire the whole time, Jemadar Daryao's men attacked and destroyed the first Japanese bunker, killing the crew. The Jemadar himself fired a number of M9A1 rifle grenades to subdue the Japanese position. The second bunker was then assaulted with grenades and Sten machine guns. This too was destroyed and Jemadar Daryao and his men went on to clear the remainder of the area, thus allowing the main advance to proceed. For this action, Jemadar Daryao was awarded the Military Cross and Havildar Dulip Singh the Military Medal.[22]
Moving eastwards beyond the crossroads, a further bunker was encountered and one of the Lees was sent to deal with it. As 'C' Company of the Royal Berkshire Regiment approached Shwegyin, the Company Commander, Major Pemberton, brought up his reserve platoon to the south, between the 'chaung' and Mandalay Hill, to attack the Japanese at Shwegyin Bridge from the flank. This was the final action of the day in the ‘chaung’. Altogether, forty Japanese were killed and a number of weapons captured including three British Bren guns that had been taken by the Japanese at the surrender of Singapore in February 1942. Also captured was the anti-tank gun that had knocked out two Stuart tanks of the 7th Light Cavalry the previous day. The area was at first reported as clear, but throughout the afternoon, Japanese soldiers continued to creep back into the 'chaung'. At 16:00, the Intelligence Officer of 'C' Company, 2nd Battalion, Royal Berkshire Regiment, was in the 'chaung', searching Japanese bodies for identification. He encountered a number of Japanese soldiers and killed three of them before making a hasty retreat. It was not until 17:00 that the 'chaung' was finally declared safe. 'D' Company then followed 'C' Company and passed through their comrades to climb to the summit of Mandalay Hill, relieving the Gurkhas there by nightfall. In total, it was estimated that the 2nd Battalion, Royal Berkshire Regiment killed 73 Japanese on 9th March, for the loss of only two British other ranks killed and four wounded.[23] [24]
During the night that followed, the rear position of the 8th Battalion, 12th F.F.R. suffered ongoing sniper fire and a patrol of the 4th Battalion, 4th Gurkha Rifles was engaged by an enemy gun and machine gun fire from inside the fort. A Japanese medium gun scored a direct hit on a pagoda on the hill but all enemy fire was silenced by British artillery.[25]
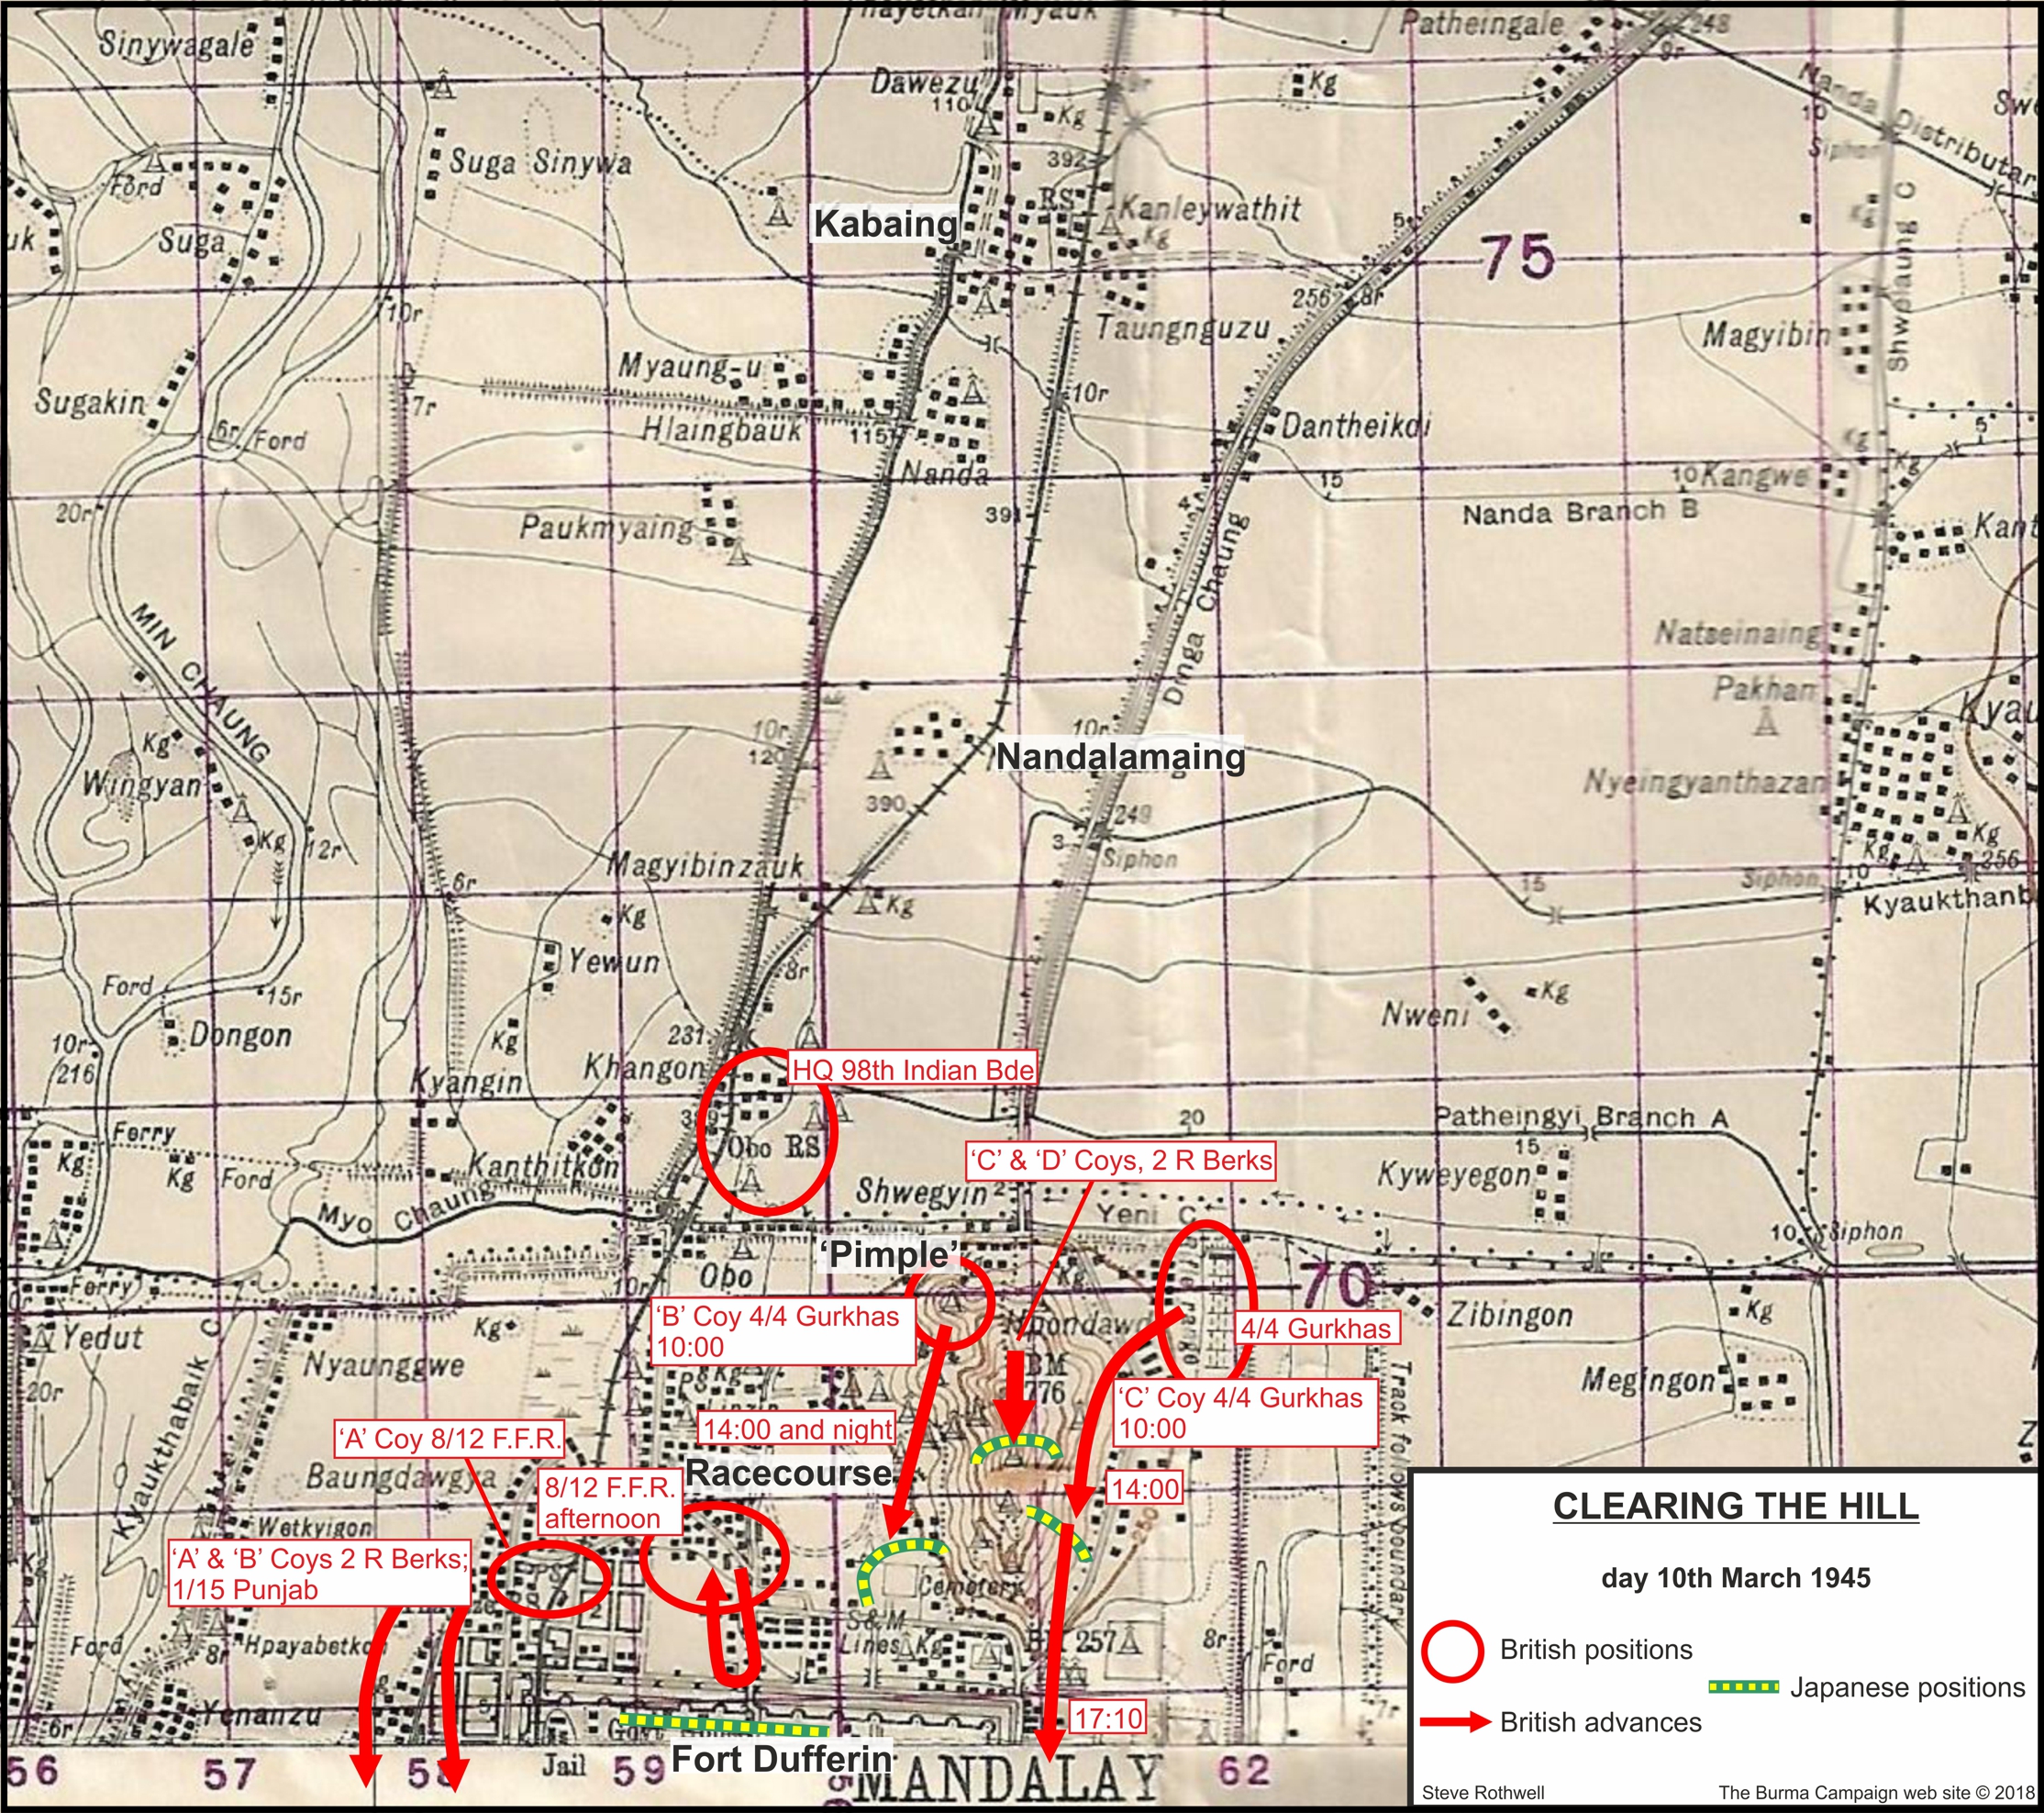
Clearing the Hill – 10th March
At around midnight on 9th March, the Headquarters 98th Indian Infantry Brigade, issued orders for the continuing operation to clear Mandalay. Two major tasks were set out for 10th March. First of these was the clearance of Fort Dufferin and the area to the west of the fort by the 8th Battalion, 12th Frontier Force Regiment and the 2nd Battalion, Royal Berkshire Regiment, less two companies. The second was the elimination of all Japanese defenders on Mandalay Hill by ‘C’ and ‘D’ Companies, 2nd Battalion, Royal Berkshire Regiment and the 4th Battalion, 4th Gurkha Rifles.[26]
Clearing the Hill, 10th March 1945
Click image to open full size in new window
The plan to clear Mandalay Hill involved the top of the hill being taken by the infantry of the 2nd Battalion, Royal Berkshire, Regiment, whilst the 4th Battalion, 4th Gurkha Rifles cleared the western and eastern slopes. Having cleared the slopes, the 4th Battalion, 4th Gurkha Rifles was then to advance further southwards and clear the area to the east and south east of Fort Dufferin. Lt. Colonel Mackay issued orders for his battalion, the 4th Battalion, 4th Gurkha Rifles, at 07:30 on 10th March. From the 'Pimple' position on the north eastern slope of Mandalay Hill, where it had spent the night, 'B' Company was to advance south along the western slopes of Mandalay Hill and then turn east to pass between the hill and Fort Dufferin until reaching the eastern edge of the fort. From the main battalion position at the foot of the hill to the north east, 'C' Company was to move along the eastern slope of the hill, clearing the area down to the line of the canal near the north east corner of the fort. 'D' Company would then advance through 'C' Company down to a line about half way down the east wall of the fort, followed by the remainder of the Battalion, together with 'A' Company which would then clear the remainder of the area to the east of the fort. The final phase would see the Battalion clear the area of Mandalay city south of the fort. In support of the Battalion were a field regiment and a troop from the 275th Anti-Tank Battery, R.A. in the mortar role. The 134th Medium Regiment, R.A. was available on call to support both the Gurkhas and the 8th Battalion, 12th F.F.R. The Gurkhas were also supported by the Lee tanks of 'C' Squadron, 150th Regiment, R.A.C., a platoon of engineers from the 65th Indian Field Company and a platoon of medium machine guns from 'A' Company, Machine Gun Battalion, 11th Sikh Regiment.[27]
The operation was planned to begin at 09:00 however it was decided to delay the start to allow more time for the 2nd Battalion, Royal Berkshire Regiment to clear the top of Mandalay Hill. An hour later, at 10:00, Brigade Headquarters ordered the 4th Battalion, 4th Gurkha Rifles to carry on as planned, despite the operation to clear the top of the hill being held up by the Japanese defenders. At 10:15, 'B' and 'C' Companies began to push ahead around the western and eastern slopes of the hill. At 12:30, 'C' Company reported that progress was slow due to sniping and machine gun fire from the southern slopes of the hill and from the east. The right hand platoon, moving around the lower slopes, was shelled by an enemy infantry gun and suffered some casualties. 'B' Company then reported good progress in clearing the racecourse area but by 14:00 both companies were reporting that they were held up by medium and light machine gun fire from the southern slopes of the hill. At this point, a troop of Lee tanks was sent to give fire support to the Gurkhas. No. 2 Troop, under Lieutenant H.A. Hjersing, had remained in reserve at Shwegyin, immediately north of Mandalay Hill, for the best part of the day. The Troop now moved into action, sending two Lees to support the Gurkhas on the eastern slopes while the third, call sign '2B', remained at Shwegyin to provide a wireless link from the infantry line connecting it to the top of the hill. Upon arrival, targets up above were brought under heavy fire from the base of the hill by the two Lees. With the support of the tanks, 'C' Company was able to reach its objective on the first line of the canal by around 17:10 and immediately began to dig in for the night. On the western slopes, further progress by 'B' Company was blocked by heavy fire from the area of the cemetery and the nearby pagodas. At around 15:00 that afternoon, No. 3 Troop, 'C' Squadron, 150th Regiment, R.A.C, under Lieutenant S.F. Bates, was switched from supporting the 2nd Battalion, Royal Berkshire Regiment on top of the hill to supporting 'B' Company on the western slopes. A number of Japanese 75mm guns were engaged by the tanks and later two of these guns were found to have been destroyed. Despite this, no advance to the east was possible and 'B' Company remained in the area south east of the racecourse for the night while the tanks returned to Shwegyin. That evening, 'D' Company was sent out eastwards from the hill to block the road running from the area of Bugon village to the east. Having reached the position, the Company established itself for the night. Battalion Headquarters and 'A’ Company spent the night in the Gurkhas' original position at the foot of the north east end of Mandalay Hill. The Gurkha casualties during the day had been light with two other ranks killed and ten wounded.[28]
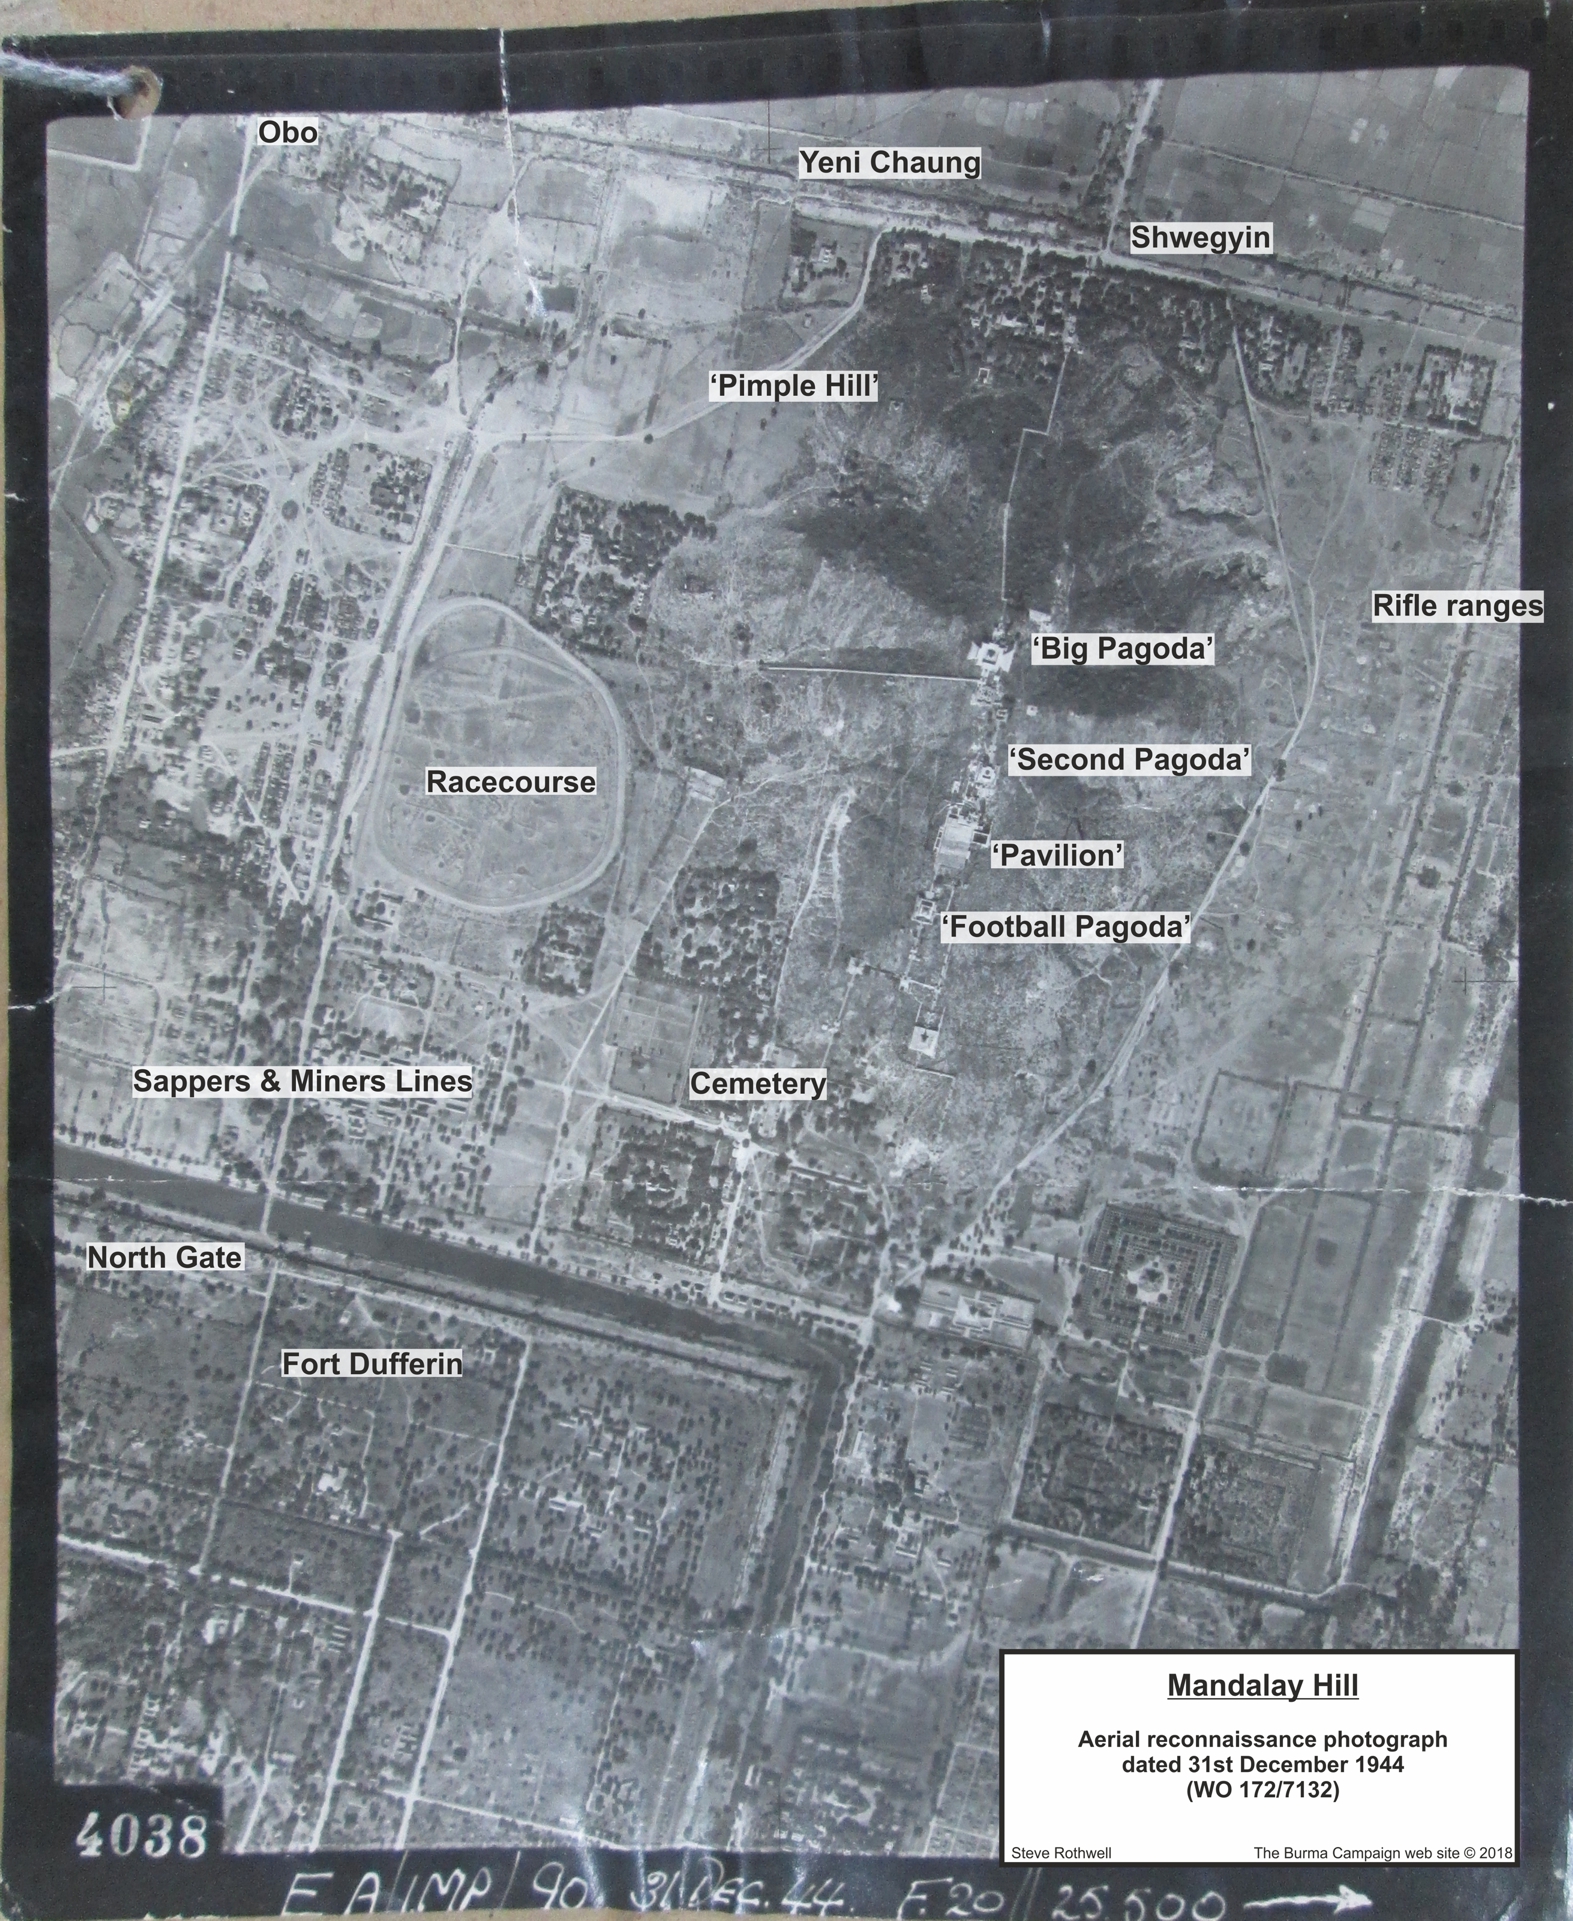
An aerial reconnaissance photograph of northern Mandalay, taken 31st December 1944. Clearly seen are: Mandalay Hill (top centre); the racecourse (to the left/west of the hill); the road leading to Fort Dufferin; the north moat and bridge across to the North Gate. (War diary 98th Indian Infantry Brigade, WO 172/7132.
Click image to open full size in new window
While the Gurkhas fought to clear the slopes of Mandalay Hill and other units attempted to gain entry to Fort Dufferin and to clear the town, two companies of the 2nd Royal Berkshires attempted to clear the Japanese-held pagodas on the hill. With Battalion Headquarters and ‘A’ and ‘B’ Companies committed to clearing the western area of Mandalay, to the west of Fort Dufferin, on the morning of 10th March, 'C' and 'D' Companies, led by Major Twidle, the Battalion second-in-command, were detached under the direct command of the 98th Indian Infantry Brigade with a view to securing the remainder of the top of Mandalay Hill. The situation on the hill that morning was that the two companies were concentrated at the large temple on the summit, referred to as 'Big Pagoda'. The Japanese held the ridge top to the south, centred on buildings that were referred to by the British infantry as 'Second Pagoda' (actually the shrine or temple containing the San Da Mukhi statue), the 'Pavilion' (the Myatsawnyinaung Thein) and the 'Football Pagoda' (the Byar Deik Paya temple). Two Japanese field guns located to the east of the hill, continued to shell 'Big Pagoda' throughout the morning, but few if any casualties were suffered. In the first move, 'C' Company was ordered to relieve 'D' Company on the summit. Then, 'D' Company, supported by artillery, mortars and the medium machine guns of 'B' Company, Machine Gun Battalion, 11th Sikh Regiment, was sent to clear the area to the south. 'D' Company’s first objective was the 'Second Pagoda'. Given that the only avenue of advance was along a narrow ridge with sides that fell away steeply, it was only possible to attack with a single platoon. A second platoon was to provide supporting fire, over the heads of the assault platoon, whilst the third platoon was held in reserve. The attack was preceded by an artillery bombardment, which due to the difficult nature of the target, was deferred until 13:30 when a ten minute bombardment was laid down on the 'Second Pagoda'. As soon as the artillery ceased firing, the assault platoon moved forward but was stopped by fire within forty yards of the objective. The reserve platoon then attempted to outflank the enemy via the steep western side of the hill but it too came under heavy fire and suffered many casualties. [29]
An artillery Forward Observer reported that the infantry were held up by a medium machine gun. Additional direct fire support was now called for in the shape of the Lee tanks of ‘C’ Squadron, 150th Regiment, R.A.C. No. 3 Troop, led by Lieutenant S.F. Bates, had been held in reserve near Obo Railway Station until called forward to a position just to the east of the racecourse (map reference 593693) from which the Lees could provide direct fire support to assist the two companies of the 2nd Royal Berkshire Regiment on top of the hill. The tanks fired at a range of around 1,500 yards at targets indicated by smoke laid by mortars accompanying the infantry. Communication was made possible by linking to the tank, call sign '2B' at Shwegyin. Each tank fired its complete load of 75mm shells, just less than 50 rounds per tank, at the targets indicated. Their job done, at around 15:00, the tanks of No.3 Troop moved off to support the 4th Battalion, 4th Gurkha Rifles on the western slopes. Another advance by the Royal Berkshires was then attempted on the eastern side of the hill from where the enemy could be seen firing from behind the pillars of the many arches making up the pagoda. Having showered the defenders with hand grenades, the infantry assaulted the structure and eventually, at around 16:25, after fighting involving both companies, the 'Second Pagoda' was taken. Some 27 enemy dead were counted and eight medium machine guns were captured. With the support of direct fire from the tanks, the infantry had managed to advance about 300 yards. The Japanese survivors escaping from the 'Second Pagoda' did so by way of some steps which ran down to a tunnel running across the full width of the hill in front of the 'Pavilion'. Once here, the Japanese could not get to the 'Pavilion' because of the fire coming from the Sikh machine gunners, so they took shelter in the tunnel. Both ends of the tunnel were open and the Japanese covered these with machine guns. The British infantry at first tried to reach the Japanese with grenades but without success. Eventually, petrol was thrown in to the tunnel entrances and set fire to with phosphorous grenades. The Japanese, unable to escape, died a horrible death. [30]
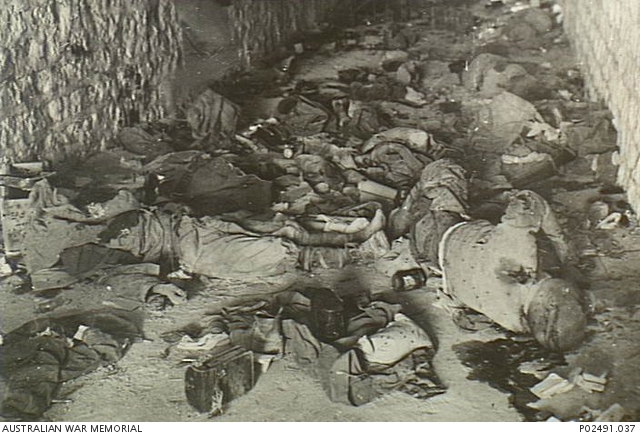
Dead Japanese soldiers lie where they were killed in a tunnel at the south western end of Mandalay Hill, March 1945.
The next objective was the flat-roofed 'Pavilion’. The large, open roof was supported upon iron stanchions embedded in stone and concrete which was built up to form a solid base on the rocky hill. The flat roof was some seventy five feet long by fifty feet wide and “rather resembles the roof of a football stadium”. Under this and approached by a wide staircase, were a number of chambers where the Japanese were holding out. The fourteen foot high, smooth concrete sides of the building were impossible to climb and it was not possible to outflank the structure from the south. There was only one entrance on the north side of the building and this door, covered from within by Japanese machine guns, was protected by steel netting which the attacking British infantry could not destroy. Further to the south was another temple with a domed roof, the ‘Football Pagoda’, also held by the Japanese. It was not known how the Japanese were supplied and the assumption was that water and supplies had been stockpiled by the defenders. An attempt was made to cross the flat roof but was stopped by fire from the 'Football Pagoda’. Attempts to break through the flat roof of the ‘Pavilion’ were defeated by the thickness of the concrete of which it was made, it being around nine inches thick. At 18:15, reports suggested that the top of the hill was clear with the exception of a single bunker containing around five Japanese. In fact, desperate Japanese soldiers continued to hold out in several places and at dusk, it was decided to consolidate the positions currently held, with 'C' Company at the 'Big Pagoda' and 'D' Company at the 'Second Pagoda'. The plan for the next day was to eliminate the remaining Japanese by first seizing the 'Football Pagoda' and then attacking the 'Pavilion' from the south.[31]
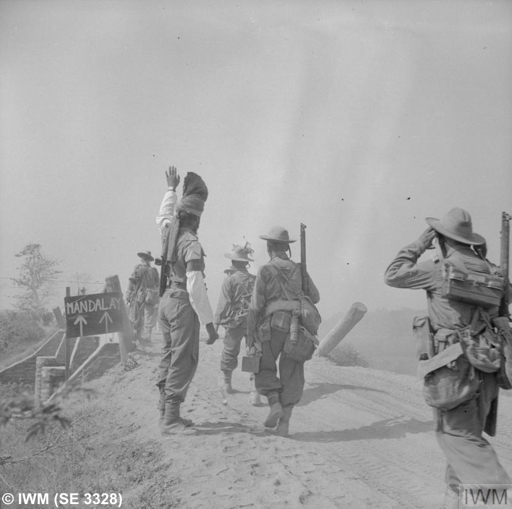
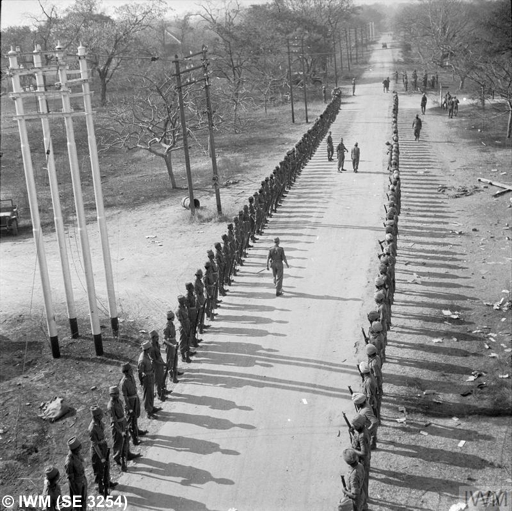
Men of the 1st Battalion, 15th Punjab Regiment enter Mandalay City, having been released from 'Stiletto' Force on 10th March 1945 (this photograph was taken on 10th or 11th March).
Elsewhere on 10th March, while two companies fought their way along the top of Mandalay Hill, the rest of the 2nd Battalion, Royal Berkshire Regiment was also in action in the western part of Mandalay city. The 1st Battalion, 15th Punjab Regiment was now back in action, having been released from duty with ‘Stiletto’ Force and now under the command of the 98th Indian Infantry Brigade. This battalion was also involved in the fighting to clear the western part of Mandalay city. During the day, the 8th Battalion, 12th F.F.R. launched a concerted attack in the area of the North Gate of Fort Dufferin but despite great gallantry the attack had to be called off when it was realised that progress could only be made at great cost. [32]
The Struggle for the Pagodas - 11th March
By the morning of 11th March, the two companies of the 2nd Royal Berkshire Regiment were firmly established on the north end of the hill. The remaining Japanese defenders of the hill remained barricaded in a number of buildings to the south of the Royal Berkshires' position. Beyond the area of the ‘Second Pagoda’, captured the previous day, was the flat roof of the large concrete ‘Pavilion’.[33]
Before new attacks were launched that morning, medium artillery was used to try to reduce the 'Pavilion' and 'Football' pagodas. The targets were very difficult to hit, being as they were on the top of a ridge. A miss of only a few feet often resulted in the shell screaming over the hill and exploding half a mile away. Two direct hits were made on the 'Pavilion' but failed to penetrate the concrete walls. Mortar fire directed at the 'Football Pagoda' included a number of smoke bombs and using the cover provided by these, machine gunners from 'B' Company of the Machine Gun Battalion, 11th Sikh Regiment, dashed across the 'Pavilion' roof to provide covering fire for 'D' Company. However, as the smoke lifted, the Sikhs became visible to the Japanese defenders in the 'Football Pagoda' and came under machine gun fire from that position. The machine gunners distinguished themselves when they came into direct contact with the Japanese; “"In the action" to capture the hill, Havildar Anokh Singh exhibited great bravery as he dashed ahead of the attacking infantry with an armful of grenades to kill seven Japanese in an underground passage who had been holding up the advance. Just after he threw his last grenade, "he was shot through the heart"”. Shortly afterwards, Sepoy Naranjan Singh (23861) earned a 'gallantry certificate' for a fine example of initiative and determination. He was the No. 3 of a medium machine gun supporting the infantry as they advanced. Both the No.1 and the No.2 were killed by snipers and the machine gun fell silent. Sepoy Naranjan Singh was 20 yards behind the gun at the time his comrades were killed but he then dashed forward to the gun, pushed the dead aside and continued to fire the gun, helping the infantry to take the objective.[34]
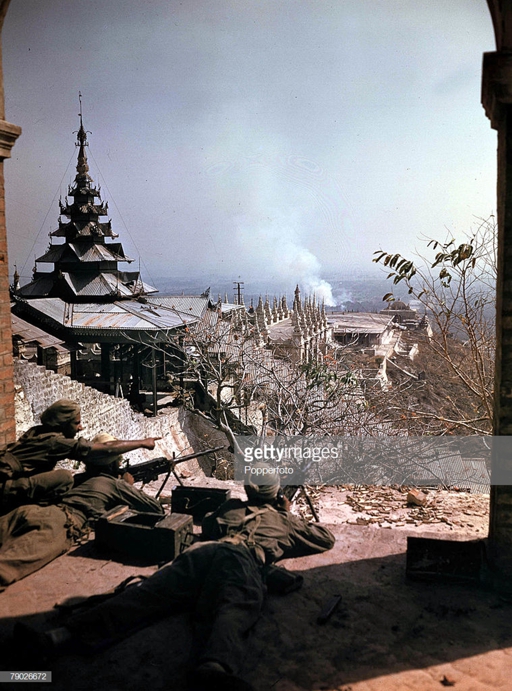
Sikh machine gunners in action in the area of the Sutaungpyi (Su Taung Pyae) pagoda on the summit of Mandalay Hill. To their front (right centre of the photograph) can be seen the flat roofed building (Myatsawnynaung Thein) and the pagoda (Byar Deik Paya) just beyond. The flat roofed building, at map reference 609692, referred to as the 'Pavilion' and code-named 'ABLE', posed a considerable obstacle to the 2nd Battalion, Royal Berkshire Regiment as they fought to reach the Japanese defenders underneath. The pagoda to its south, 'Football Pagoda', is at map reference 609690 and was code-named 'Baker'. The code names were used to identify the buildings for the final attack to clear them on 12th March 1945. (This is possibly a staged photograph taken some time after the action.)
It is possible that this second incident of bravery by the Sikh machine gunners was the same one described by Major John Hill, who was greatly impressed by the courage of the Indian soldiers; "C Company, on Mandalay Hill, had been held up by snipers and all movement on the hill was inevitably sniped. A Sikh machine-gun mounted on the hill had been ordered to fire at a Japanese position. The No. 1 on the gun, firing, was shot stone dead through the head from an enemy position. Without hesitating, the No. 2 by his side pushed No. 1 away, laid an aim and fired, silencing the Japanese position; for cool courage that takes some beating. That was their standard of discipline and training: No. 1 is killed, 'Fall out No. 1, carry on No. 2!' - exactly as in parade-ground drill for the Vickers machine-gun."[35]
Under cover of the machine gun fire, men of the Berkshire Regiment now ran across the roof to lie with the Sikhs and leaned over the side to drop grenades on the Japanese, keeping them penned up underneath. Despite this, however, it proved impossible to enter the 'Pavilion' and the Brigade Commander therefore ordered 'D' company to withdraw and wait for additional supporting fire before making another assault the next day. After dark, 'Beehive' shaped charges were brought up and set off at selected points on the roof of the 'Pavilion'. Large numbers of grenades were then dropped through the resulting holes. Some men of 'D' Company, 2nd Battalion, Royal Berkshire Regiment remained on the roof all night, together with a couple of medium machine guns belonging to the Sikhs. Despite the risk entailed, these troops were not disturbed by the Japanese for the rest of the night. Plans were made for further attacks the next day and orders issued by the Headquarters 98th Indian Infantry Brigade, including a request for an air strike on the remaining enemy held pagodas. The infantry attack was to be deferred to late morning to follow the air strike, should it be authorised. If the air strike request were turned down then the attack would go in earlier, preceded by an artillery bombardment.[36]
A contemporary photograph taken from almost the same position as that of the Sikh machine gunners. The flat roofed 'Pavilion' can just be made out to the middle right of the photograph, between the pointed pagoda and the domed pagoda (Byar Deik Paya) beyond. In the far distance can be seen the east moat of Fort Dufferin. The area to the east of this was cleared by the 4th Battalion, 4th Gurkha Rifles in the days that followed the capture of Mandalay Hill.
As a result of the day’s fighting, the ‘C’ and ‘D’ Companies of the Royal Berkshire Regiment suffered one killed and ten wounded. Many more Japanese were killed, having bravely refused to give up their positions or to surrender. Of the original estimated number of 150 Japanese defenders on the hill, around 80 had been killed up to this point. Sadly their self-sacrifice left the British no other option but to kill them in their shelters. The remainder held on, in bunkers and buildings on the southern slopes of the hill and in the area of the cemetery, awaiting their inevitable fate.[37]
While the Royal Berkshires and their Sikh comrades struggled with the Japanese on top of the hill, the 4th Battalion, 4th Gurkha Rifles and the 8th Battalion, 12th F.F.R. battled to clear the south western slopes. The main task given to the 4th Battalion, 4th Gurkha Rifles for 11th March was to continue to clear the area of Mandalay city to the east and south east of Fort Dufferin. However, ‘B’ Company had yet to link up with the main battalion position at the foot of the hill to the north east, having been unable to break through the area of the cemetery and pagodas on the south western slope. A troop of Lee medium tanks allotted to support the Gurkhas was first assigned to help 'B' Company complete the previous day's task of clearing this enemy held area. The first moves took place early that morning, and saw Battalion Headquarters and 'A' Company moved southwards to join 'C' Company at the canal. This move was accomplished by 08:30 despite the attentions of Japanese snipers and only one man was wounded. Having spent the night in the area to the south east of the racecourse, it was now 'B' Company's task to clear the area to the east and push through to join the Battalion near the north east corner of Fort Dufferin.[38]
Indian troops in Mandalay take aim at Japanese positions, March 1945.
The war diary of the 150th Regiment, R.A.C. records that three troops were in action on 11th March. No.s 1 and 2 Troops were assigned to support clearance operations in Mandalay city to the west of Fort Dufferin. The diary states that the third troop, No. 3 Troop, was allocated to support the 8th Battalion, 12th F.F.R. and not the 4th Battalion, 4th Gurkha Rifles, however this appears to be a mistake. The war diary of the 4th Battalion, 4th Gurkha Rifles records that at 09:00, a troop of tanks was sent to help 'B' Company clear their area and push through to rejoin the battalion. By 12:40, the company succeeded in passing through this area and joined up with the battalion. However, the company had failed to clear the area between the south end of Mandalay Hill and the fort and there were many Japanese remaining in the area of the cemetery and the pagoda near the north east corner of the fort. This fact would now be discovered, at a cost by, a company of the 8th Battalion, 12th F.F.R. who had been detailed to support the advance of 'B' Company.[39]
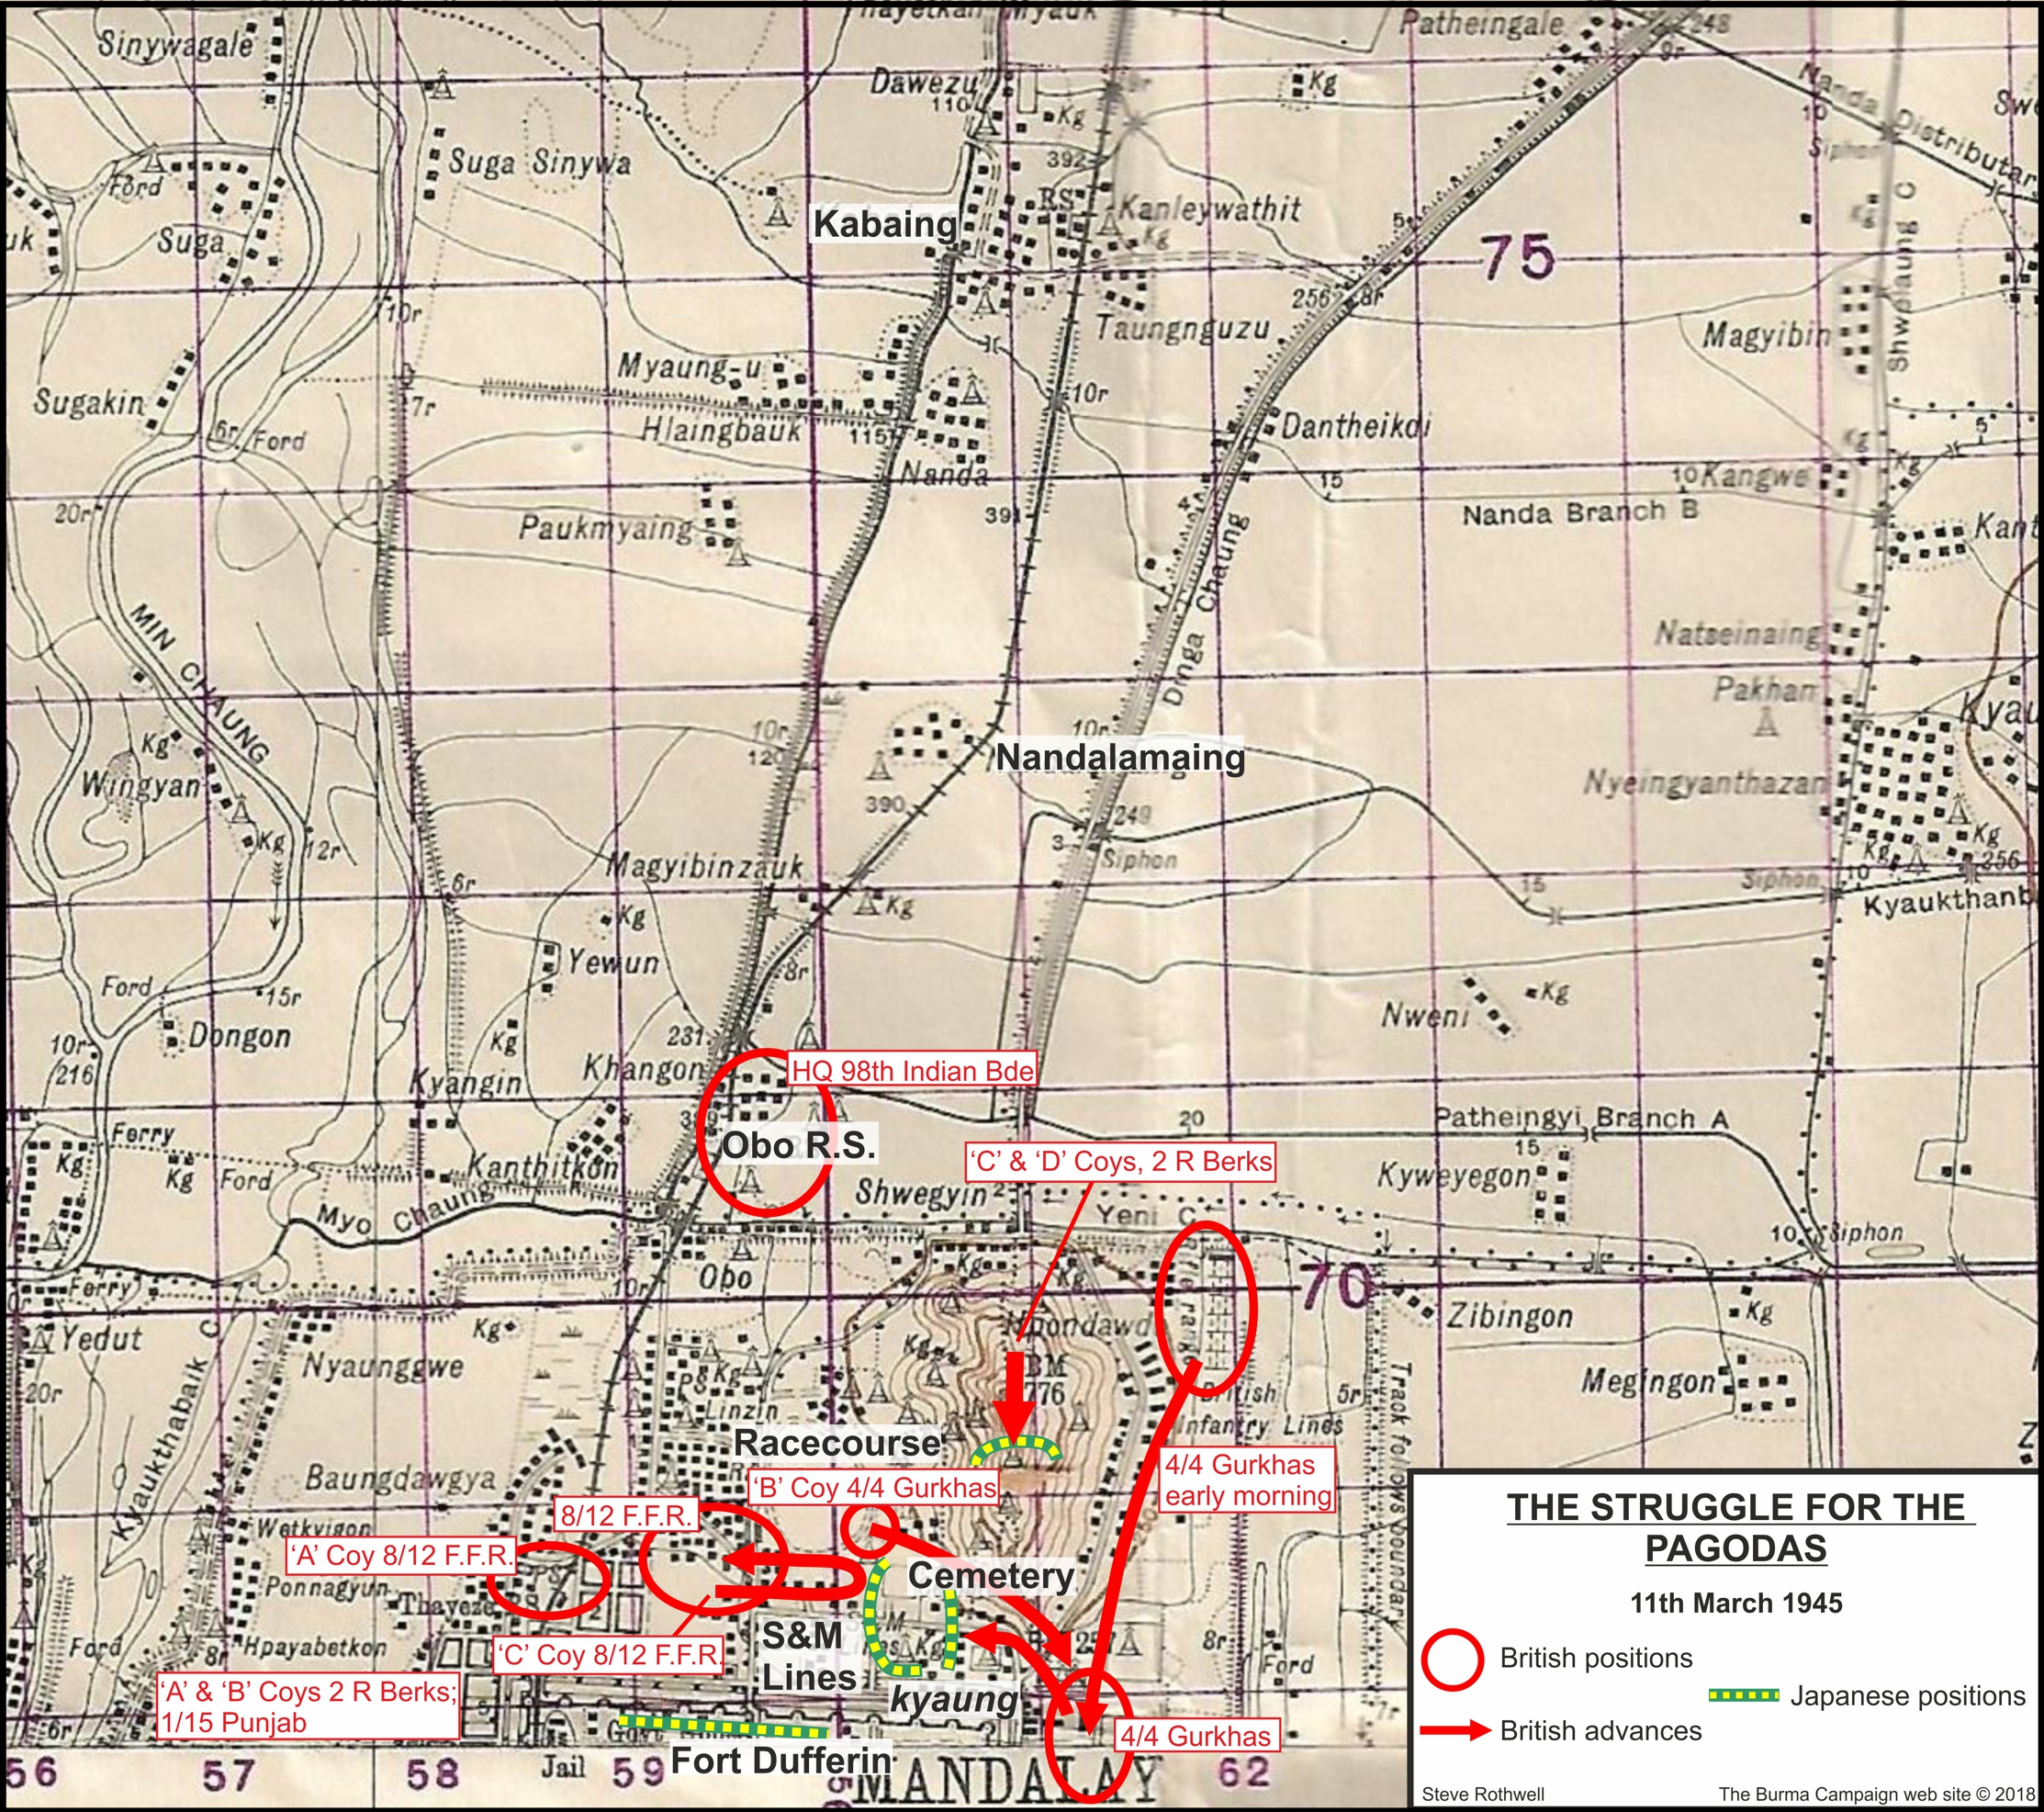
The Struggle for the Pagodas, 11th March 1945
Click image to open full size in new window
At 09:00 that morning, the commander of the 98th Indian Infantry Brigade visited the 8th Battalion, 12th F.F.R. He passed on the news that much of Mandalay Hill had been captured with the exception of the southern spur. Informing the battalion that the 4th Battalion, 4th Gurkha Rifles and two companies of the 2nd Battalion, Royal Berkshire Regiment were now working their way down the hill from the north, the Brigadier ordered that a company of the 8th Battalion, 12th F.F.R. should be sent to take up a position in the area south of the cemetery to act as a 'flank stop' in support of the other two battalions. Shortly before 10:00, 'C' Company set off, with orders to provide the 'flank stop', ready to block any enemy movement westwards from the direction of the north east corner of Fort Dufferin when the 4th Battalion, 4th Gurkha Rifles advanced southwards on the east side of Mandalay Hill. ‘C’ Company was also to eliminate any Japanese snipers or gun positions that revealed themselves by opening fire from the fort wall. The company followed a route that took it north of the Sappers and Miners Lines towards the area of the cemetery and Buddhist 'kyaung' or monastery (marked 'Kg' on the map at 603681). At around 10:30, 'C' Company came under heavy fire from the area of the fort wall, from the southern slopes of Mandalay Hill and from the cemetery and 'kyaung' area. Light machine guns and snipers pinned down the Indian infantry who were horribly exposed on open ground. Casualties mounted as men were shot where they lay, the Japanese firing bursts at each man in turn. After some time, the company commander was able to crawl over to his wireless operator and arranged for smoke to be brought down to cover the withdrawal of his men. As the rearward platoon pulled back and the evacuation of the wounded started, further intense fire was opened up on anyone moving and more casualties were suffered. More smoke was laid down and gradually the men got back, the wounded either being brought out by stretcher or with the support of a comrade. During the final smoke barrage, some high explosive shells were also fired but this was ineffective as the Japanese positions could not be pinpointed. Shortly after 13:00, the company had completed its withdrawal from an area that the previous day had been reported as clear by the 4th Battalion, 4th Gurkha Rifles. The casualties were three killed and seventeen wounded. Captain E.E. O’Connor of ‘C’ Squadron, 150th Regiment, R.A.C. reported that; "No. 3 Troop in sp of one coy 8/12 FFR assisted the coy to clear the area of Kg 603681. This op was a complete success and no cas to tks were incurred." The operation was not a complete success as far as ‘C’ Company, 8th Battalion, 12th F.F.R. were concerned, and Captain O’Connor’s report must actually refer to the movement of ‘B’ Company, 4th Battalion, 4th Gurkha Rifles. The war diary of the 8th Battalion, 12th F.F.R. does not mention there being any tanks in support of the unfortunate 'C' Company.[40]
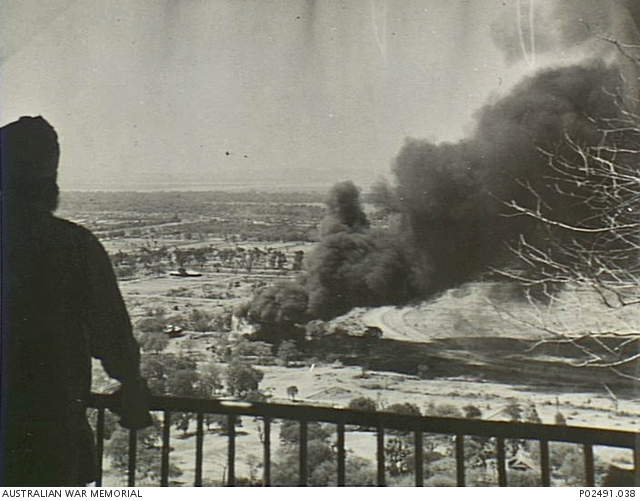
From the top of Mandalay Hill, a Sikh soldier watches a blazing pagoda near the racecourse (right), March 1945. The cemetery is to the left of the burning pagoda, in front of the soldier.
Realising that the area recently traversed by 'B' Company, 4th Battalion, 4th Gurkha Rifles was still occupied, ‘B’ Company was now ordered to return clear the Japanese positions. An attack was made from the east with tank support. However, by 17:00, the company had made no progress against snipers and light machine guns dug in among the many pagodas and walls in their area. The company commander, Lieutenant R.B. Adams, was wounded in the arm and evacuated. At this point, the company was ordered to dig in where they were for the night. Elsewhere, during the day, 'D' Company, 4th Battalion, 4th Gurkha Rifles had been held up attempting to reach the crossroads at Bugon owing to heavy fire coming from several enemy bunkers. There were local reports of up to 300 Japanese in this area and when the supporting tanks came into action they knocked out two enemy 75mm guns at map reference 610669. 'A' Company advanced slowly southwards to the east of the fort, bothered by the occasional sniper hiding amongst the many houses, small pagodas, walls and trees.[41]
The Final Morning – 12th March

The Final Morning, 12th March 1945
Click image to open full size in new window
It appears that the planned air strike on Mandalay Hill was not authorised for fear of serious damage occurring to the religious buildings. Instead, at first light, the men of the Royal Berkshire Regiment dropped more grenades through the holes in the roof of the 'Pavilion', after which an assault was made through the door. The machine gun which had previously kept the British infantry at bay was found to have been destroyed and around it lay several dead Japanese. No living occupants were found inside the building. This breakthrough was followed up immediately by an advance to the 'Football Pagoda' against little opposition. Finally, 'C' Company were able to clear to the bottom of the hill and patrols were sent forward towards the moat near the north east corner of Fort Dufferin but encountered no Japanese. The secretary to the Holy Hermit, U Khanti, met Major Twidle and pointed out the positions of Japanese mines which were then cleared. Shortly after, the Corps and Divisional Commanders visited the hill and inspected the enemy positions. Major Twidle received personal congratulations for the good work done by the two companies in what the war diary describes as 'clearing so effectively one of the key points in the defence of Mandalay'.[42]
Responsibility for the final clearing of the cemetery and pagodas in the area south of Mandalay Hill was given to the 8th Battalion, 12th F.F.R. The clearance of the southern slopes of the hill contiguous with this area was a task given to the detachment of the 2nd Battalion, Royal Berkshire Regiment on the hill itself, once they had cleared the last Japanese from the buildings on the hill. The 8th Battalion, 12th F.F.R. returned in force on 12th March to clear the area which had cost 'C' Company so much blood the previous day. Preceded by the fire of a troop of medium artillery, followed by a barrage by the supporting field artillery which also laid smoke to screen the northern flank, at around 11:30, 'B' Company began their advance, supported by the three Lee tanks of No. 3 Troop, 'C' Squadron, 150th Regiment, R.A.C. Encountering little resistance, the company cleared the area by just after 13:10.[43]
An artillery observation party at work from a gallery of one of the pagodas atop Mandalay Hill. They are directing artillery fire onto Japanese positions inside Fort Dufferin or in Mandalay City, March 1945.
The Aftermath – 13th March and Beyond
Despite the final clearance of the last Japanese from Mandalay Hill, in the days that followed there were few opportunities for rest for the infantry of the 98th Indian Infantry Brigade. At 10:30 on 13th March, 'C' and 'D' Companies of the 2nd Battalion, Royal Berkshire Regiment handed over their positions south of Mandalay Hill to ‘C’ and ‘D’ Companies of the 8th Battalion, 12th Frontier Force Regiment and joined the rest of the Battalion fighting in the area of the city west of the fort. On 15th March, the command of operations in and around Mandalay passed to the 64th Indian Infantry Brigade. The Royal Berkshire Battalion continued to fight for the western and southern areas of Mandalay City until finally being withdrawn on 19th March to rejoin with the 98th Indian Infantry Brigade. The 8th Battalion, 12th Frontier Force Regiment continued to operate in the city and was involved in a further attack on Fort Dufferin on the night of 17th/18th March. This attack was unsuccessful, after which the Battalion moved out with the Brigade to the Yanbon area, to the south east of Mandalay. The 4th Battalion, 4th Gurkha Rifles pushed to the east of Mandalay city, fighting with a number of parties of Japanese defenders until on 14th March, the Battalion was ordered to a hilltop pagoda to the east of the city where a quiet day was spent. The next day, the Battalion resumed the advance to the south east of Mandalay. By now the 98th Indian Infantry Brigade had been ordered to link up with the 6th Infantry Brigade, 2nd British Indian Division, to cut off the Japanese escape routes to the south and east of Mandalay. Almost immediately that Mandalay Hill was cleared, three companies, 'A', 'B' and 'D', of the Machine Gun Battalion, 11th Sikh Regiment moved to provide long range supporting fire into the enemy-held Fort Dufferin from atop the hill and from positions to the east and west of the fort. [44]
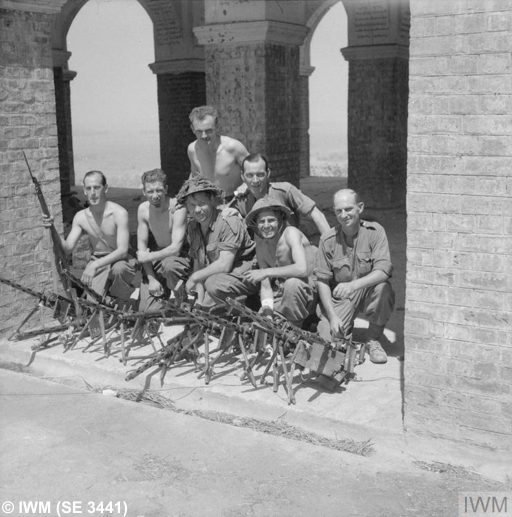
Men of the 2nd Battalion, Royal Berkshire Regiment on Mandalay Hill pose with captured machine guns originally taken by the Japanese at Singapore in 1942.
The capture of Fort Dufferin took until 20th March, when it was discovered that the surviving Japanese defenders had withdrawn through the sewers during the night. Mandalay was declared free of Japanese the next day. With the capture of the city, the Allied position in Burma had become quite strong and the 14th Army now dominated the central regions. For the British and Indian troops, the next goal was to capture Rangoon before the monsoon arrived in some five weeks’ time.[45]
British and Indian troops of the 19th Indian Infantry Division form a guard of honour in anticipation of the arrival of General Sir William Slim following the fall of Mandalay, 21st March 1945.
The defence of Mandalay had been undertaken by the Japanese 15th Division. Despite a widespread disgust of the Japanese, their unwillingness to surrender and their seeming love of death, there was also respect for their courage. In an information summary prepared on 11th March, the artillery headquarters (H.Q. R.A.) of the 19th Indian Infantry Division wrote of the Japanese; "The doggedness of their defence under what must be described as almost impossible conditions is borne out by their continued resistance in MANDALAY HILL. Certain death faces the party which numbers certainly no more than twenty-five to thirty, who continue at all hours of the day and night to shoot at anyone who dares to show himself."[46]
While facing great peril in clearing the Japanese positions on the hill, every effort had been made to minimise the damage done to the pagodas and holy places. One of the reasons for the difficulties in clearing the hill was that Major-General Rees, commander of the 19th Indian Infantry Division, had ordered that the sacred places on the hill were not to be bombed. Major Hill recalled: "This proved immediately of military value. The secretary to the holy hermit U Khanti helped us locate mines which had been left by the enemy. Before the battalion left Burma, U Khanti presented us with a replica of ancient bell of Mingun, the largest bell in the world. In the ceremonial presentation, offering thanks for our protection, he announced that 12th March should be designated '2nd Battalion, the Royal Berkshire Day', to be celebrated annually with the traditional dances. It is doubtful whether this custom has been retained in present-day Burma, nevertheless it showed the esteem in which we were held by the 'pyongyes' (monks) on the hill."[47]
The battle for Mandalay Hill and Mandalay was yet one more example of the effectiveness of the Anglo-Indian forces now fighting so successfully against a once-feared foe. This success, however, was due not only to combat efficiency, equipment and logistics; it depended on the men who marched and fought together. There was a great sense of comradeship and mutual respect between the British, Gurkha and Indian troops of the 19th Indian Infantry Division. Major Hill wrote: "There is no doubt that the Gurkhas and Indians were first-class soldiers to work with. We got on the most friendly terms with all units whom we had had supporting us. We would be marching along on some road, perhaps passing an Indian unit, when suddenly a sepoy would rush out and shake someone in the company by the hand; or we would be halted and some of the Indians would come over with great grins on their faces, showing that they knew you, even if you couldn't quite remember them; and such magic words as Kabwet or Kin-U or Singu or Mandalay Hill would be the greeting, and one knew thus that Sepoy Mohammed Khan or Sepoy Gul Mohammed or Naik Lal Bahadur was one of the machine-gunners or field artillery or field company, Royal Engineers, or even perhaps from the Frontier Force Regiment, or the 4/4th Gurkha Rifles who had been with us on such occasions. Of course, a little Urdu helped a lot at these times."[48]

Contemporary aerial view of Mandalay Hill. (Google Maps, accessed July 2018.
Click image to open full size in new window
Additional photographs of Mandalay Hill, taken in 1986, can be seen here. They include views from the hill, memorial plaques and surviving battle damage to the buildings.
2 December 2018
[1] "China Dragons, a rifle company at war, Burma 1944-45", Hill J., Blandford (1991)
[2] “Official History of the Indian Armed Forces in the Second World War, 1939-45, Reconquest of Burma, Vol II”, Prasad B., Orient Longmans (1959); “The War Against Japan Vol IV, The Reconquest of Burma”, Woodburn-Kirby S., HMSO (1956).
[3] War diary 1st Battalion, 15th Punjab Regiment, WO 172/7750; “The Worcestershire Regiment, 1922-1950”, Birdwood, Gale & Polden (1952); War diary 150th Regiment, R.A.C., WO 172/7345; War diary Machine Gun Battalion, 11th Sikh Regiment, WO 172/7733, War diary 115th Field Regiment, R.A., WO 172/7416; War diary 33rd Anti-Tank Regiment, R.A., WO 172/7379.
[4] WO 172/7750; War diary 2nd Battalion, Royal Berkshire Regiment, WO 172/7618; War diary 7th Light Cavalry, WO 172/7348
[5] War diary 254th Indian Tank Brigade, WO 172/7142; WO 172/7348; WO 172/7750
[6] WO 172/7750; WO 172/7733.
[7] WO 172/7750; WO 172/7618; WO 172/7348; War diary 8th Battalion, 12th F.F.R., WO 172/7737.
[8] WO 172/7750; WO 172/7618; WO 172/7737; “The History of the Royal Berkshire Regiment (Princess Charlotte of Wales’), 1920-1947”, Blight G., Staples Press (1953).
[9] War diary 4th Battalion, 4th Gurkha Rifles., WO 172/7777; War diary 98th Indian Infantry Brigade, WO 172/7132.
[10] WO 172/7777; China Dragons.
[11] “The Road Past Mandalay”, Masters J., The Companion Book Club (1963)
[12] WO 172/7777; WO 172/7345; War diary 5th Battalion, 10th Baluch Regiment, WO 172/7728; War diary 64th Indian Brigade, WO 172/7119; The Worcestershire Regiment.
[13] WO 172/7777; WO 172/7345; War diary 3rd Battalion, 4th Bombay Grenadiers, WO 172/7700.
[14] “Going to War on the Tube”, Arthur Gilbert, WW2 People’s War, BBC History, accessed August 2018 (now archived)
'WW2 People's War is an online archive of wartime memories contributed by members of the public and gathered by the BBC. The archive can be found at bbc.co.uk/ww2peopleswar'
[15] Captain David Hine, Commander, ‘E’ Troop, 480th Battery, 115th Field Regiment, R.A.
[16] WO 172/7777; Arthur Gilbert; Recommendation for Award for Subedar Damarsing Pun, WO 373/42/274; Recommendation for Award for Subedar Aiman Gurung, WO 373/40/44; Recommendation for Award for Major David Hine, WO 373/43/29.
[17] WO 172/7777; WO 172/7618; WO 172/7345.
[18] WO 172/7750; WO 172/7777; War diary 115th Field Regiment, R.A., WO 172/7416; War diary, 19th Indian Division, WO 172/6996.
[19] WO 172/7750; WO 172/7618.
[20] WO 172/7750; WO 172/7737.
[21] WO 172/7618; WO 172/7132; WO 172/7345; WO 172/7700, Royal Berkshire history.
[22] WO 172/7618; WO 172/7132; WO 172/7345; WO 172/7700, Royal Berkshire history; Recommendation for Award for Jemadar Daryao Singh, WO 373/40/29; Recommendation for Award for Havildar Dalip Singh, WO 373/40/98.
[23] WO 172/7618; WO 172/7132; WO 172/7345.
[24] The Commonwealth War Graves Commission website lists three men of the 2nd Battalion, Royal Berkshire Regiment killed or died on 9th March 1945.
[25] WO 172/6996
[26] WO 172/7132
[27] WO 172/7132; WO 172/7345; WO 172/7132.
[28] WO 172/7777; WO 172/7345.
[29] Royal Berkshire history.
[30] WO 172/7618; WO 172/7733; WO 172/7345; WO 172/7146; WO 172/7132, Royal Berkshire history.
[31] Royal Berkshire history, WO 172/7618; WO 172/7733; WO 172/7345; WO 172/7146; WO 172/7132.
[32] WO 172/7737; China Dragons.
[33] War diary, 19th Indian Division, HQ Royal Artillery, WO 172/6998, Royal Berkshire history.
[34] "The Sikh Regiment in the Second World War", Birdwood F.T., Naval & Military Press-IWM reprint (undated), Royal Berkshire history.
[35] China Dragons
[36] Royal Berkshire history.
[37] WO172/7618; China Dragon; WO 172/6996
[38] WO 172/7777; WO 172/7132.
[39] WO 172/7777; WO 172/7345.
[40] WO 172/7737; WO 172/7777; WO 172/7345.
[41] WO 172/7777; WO 172/7132
[42] WO 172/7618; WO 172/7132, Royal Berkshire history.
[43] WO 172/7737; WO 172/7345.
[44] WO 172/7618; WO 172/7737; WO 172/7777; The Sikh Regiment.
[45] Reconquest of Burma (Indian Official History).
[46] WO 172/6998; The Reconquest of Burma (British Official History).
[47] China Dragons; Reconquest of Burma (Indian Official History).
[48] China Dragons